


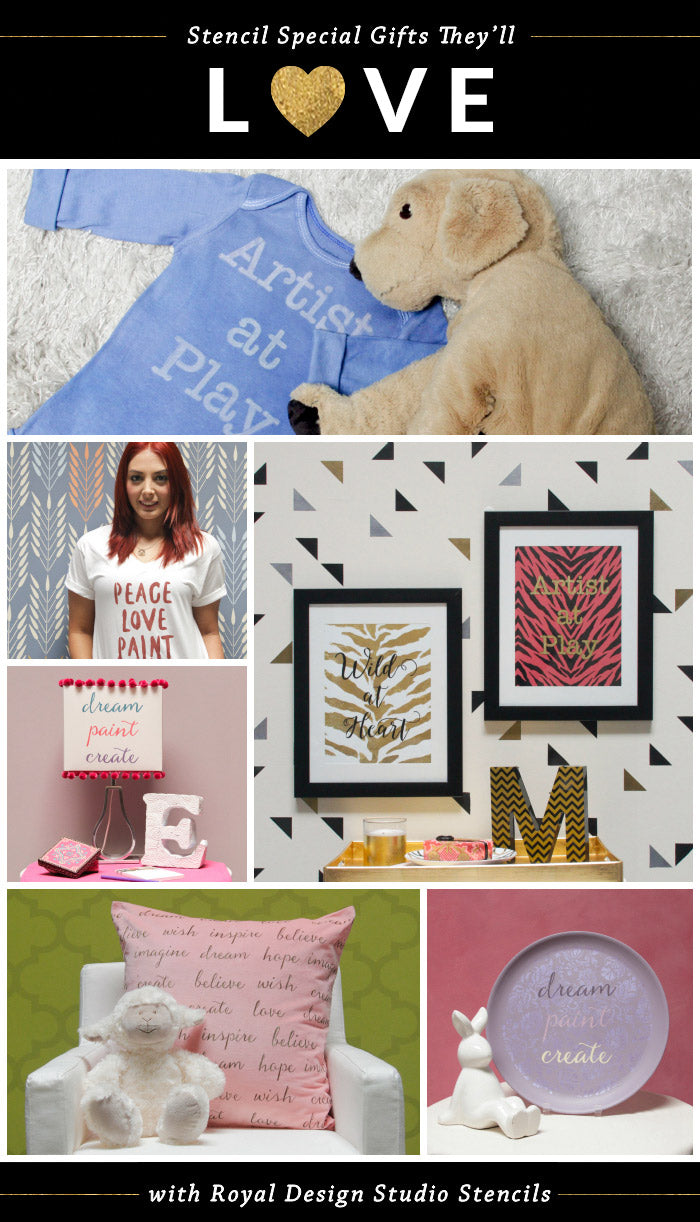
You can make the holidays even more magical and meaningful this year by stenciling goodies for gift giving to the special people in your life. Whether you need the perfect gift for a friend, sister, daughter, mother or a new baby in your life, we have an idea for you. All of these quick DIY stencil projects feature new Lettering and Typography Stencils that are easy to use and designed to inspire. Read on for the easy instructions and have fun painting and creating!
A Stenciled Pillow to Inspire Dreams
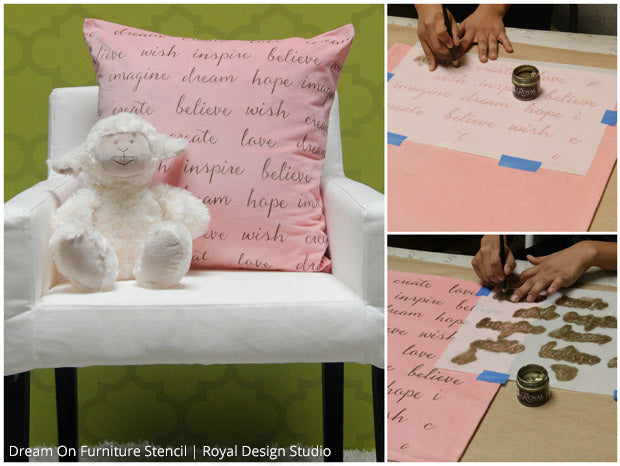
Transform an ordinary IKEA velvet pillow cover in to a sweet reminder to always believe!
Stencil Supplies
- Dream On Stencil
- Antique Gold Royal Stencil Creme Paint
- 1/2" Stencil Brush
- Velvet Cushion Cover from IKEA
Iron your pillow cover to remove any wrinkles and lay flat on a hard surface. Center the lettering stencil vertically on the pillow case, so that the writing ends the same at the top and bottom. Use a dry-brush stencil method to stencil the words with Antique Gold Royal Stencil Cremes. Use the built-in stencil registration marks to perfectly align and repeat the pattern to the edge of the pillow on all sides.
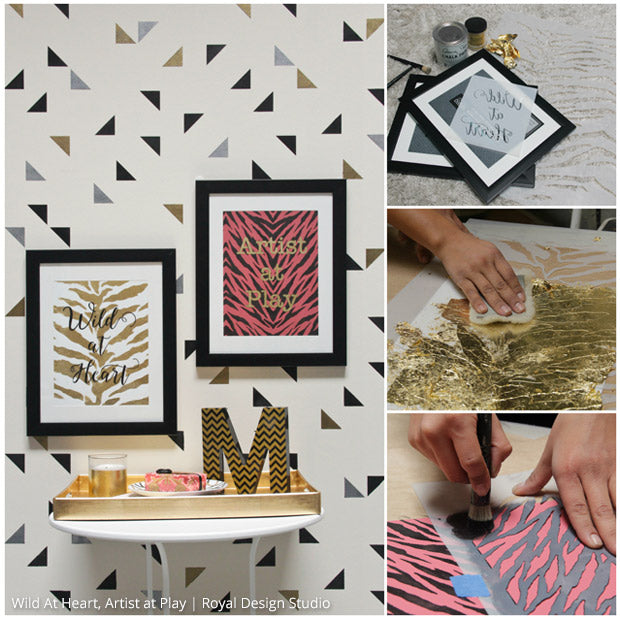
Stenciled Statements Wall Art
Take an artistic walk on the wild side by stenciling on the reverse side of an inexpensive glass photo frame. Place it over a hot stenciled animal print to create a custom piece of wall art in a matter of minutes. A black, pink, and gold leaf color palette make for a ferocious design statement!
Stencil Supplies
- Artist at Play Typography Stencil, Wild At Heart Lettering Stencil, Tiger Stripes Allover Stencil, Zebra Stripes Furniture Stencil
- Flat Black Royal Stencil Creme Paint
- Assorted Stencil Brushes
- Clear Stencil Size
- Chalk Paint® by Annie Sloan: Barcelona Orange, Burgundy, Pure White
- Imitation Gold Leaf
- Smaller roller & tray, Painter's Tape
- Photo Frames from Michaels
- Use Clear Stencil Size stencil the Tiger Stripes Stencil on a piece of white paper the size of your frame to create the background. Allow to dry for about 10 min. If needed, apply a second coat and allow to dry until it becomes tacky.
- With the stencil still in place apply Imitation Gold Leaf and burnish with a piece of lamb’s wool or soft cloth.
- To create the second background paint a piece of paper with bright pink color mix Chalk Paint® ( 1 Barcelona Orange +1 Burgandy + 1 Pure White). Allow to dry.
- Stencil the Zebra Stripes Furniture Stencil on the pink background with Flat Black Stencil Creme starting in the center. To create an allover pattern after your first repeat, flip over your stencil to continue the pattern.
- Use the Wild At Heart Stencil to stencil on the glass of one of the frames using Flat black Stencil Creme. You will be stenciling on the back of the glass so be sure to flip the stencil over as you are stenciling in reverse.
- Repeat Steps 1 and 2 on the second piece of glass to gild the stencil Artist at Heart. On the glass the drying time for the size will be longer so make sure the size is tacky before applying the leaf through the stencil.
See the following How to Stencil post for more details on these techniques: Reverse Stenciling and Gilding on Glass
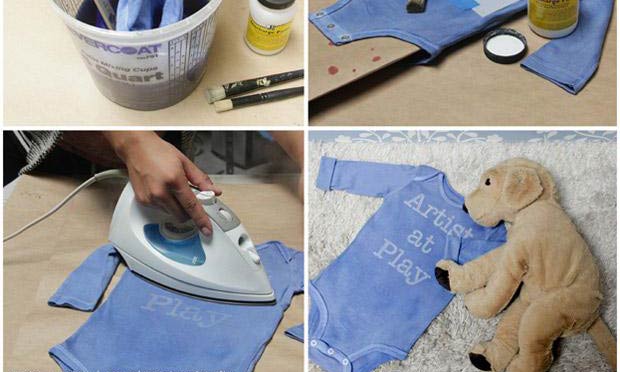
Oh Baby! Stencil a One of a Kind Onesie
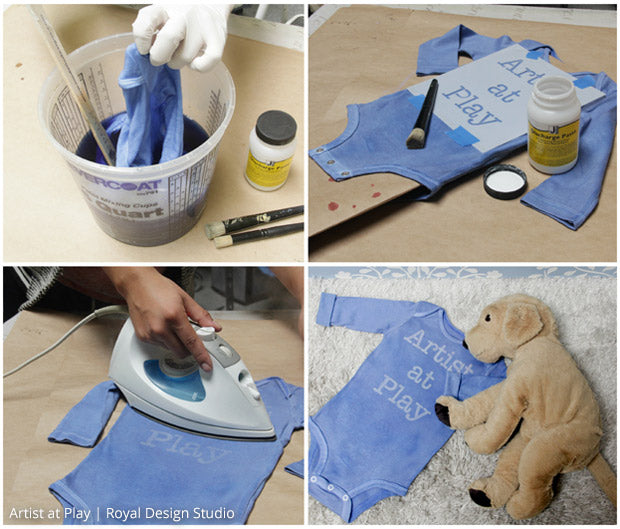
Cute baby gift idea! Hand dye and stencil a onesie with an inspiring lettering stencil from Royal Design Studio. Encourage creativity at any age!!
Stencil Supplies
- Artist at Play Lettering Stencil
- Discharge Paste
- Rit Royal Blue Dye
- 1" Stencil Brush
- White Cotton Onesie
Prewash the Onesie to remove any sizing. Mix the Rit Dye according to manufacturer instructions and allow to dry. Place a heavy sheet of paper or cardboard between the front and back of the Onesie to avoid bleedthrough and stencil with Discharge Paste. Iron with a steam iron to fully discharge the dye color. Wash before using.
Find out more on Stenciling with Discharge Paste here!
Dream Paint and Create a Lovely Stenciled Plate
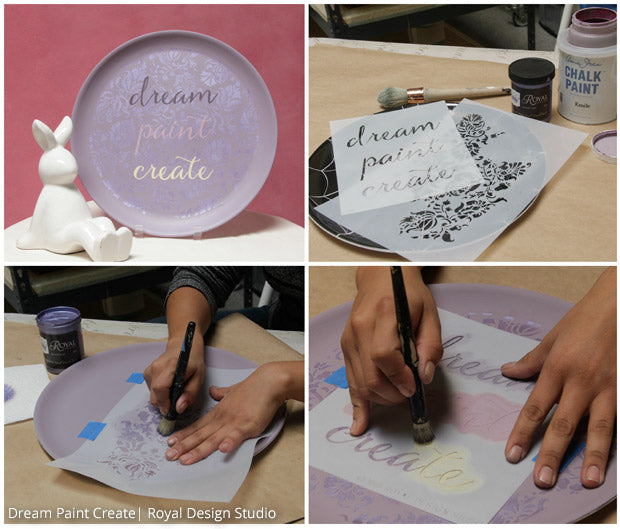
Use Chalk Paint® and Royal Stencil Creme paint to upcycle a Dollar Store plastic plate into a statement decor accent using lettering and furniture stencils.
Stencil Supplies
- Small Brocade Furniture Stencil and Dream Paint Create Lettering Stencil
- Frosted Lilac Royal Stencil Cremes
- Chalk Paint® by Annie Sloan: Henrietta, Emile, Aubusson Blue, Emperor's Silk
- 1/2" and 1" Stencil Brush
- Annie Sloan Clear Wax
- Paint a clean plastic plate with Emilie Chalk Paint® and allow to dry. Paint multiple coats for a full coverage.
- Place your stencil in the center and stencil using Frosted Lilac Stencil Creme. Stencil as close to the edge as possible but don’t stress too much about the raised edges.
- Place your typography stencil in the center and stencil using Chalk Paint® in these colors: Creme, Henrietta, and 1 part Emile+1/2 Emperors Silk+1/2 Abusson Blue. You can substitute acrylic paints that you have on hand.
- Seal with 2 thin coats of Annie Sloan Clear Wax.
Find more Stencil Tips for Stenciling with Royal Stencil Creme Paints
Dream Paint and Create a Lovely Stenciled Plate
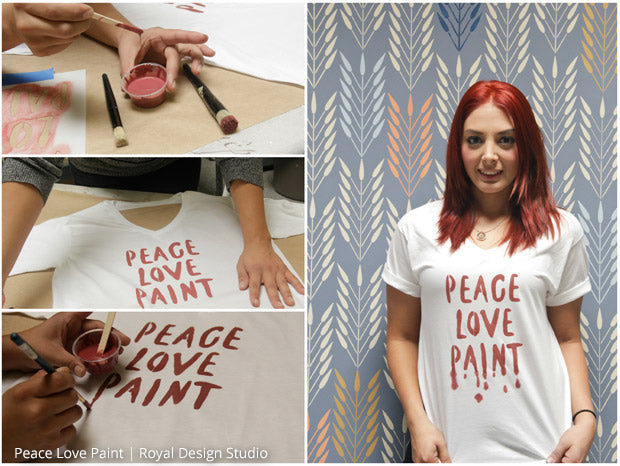
A custom stenciled T-shirt is a great DIY stenciled gift idea for yourself or a friend. Customize it with your favorite colors and painterly touches.
Stencil Supplies
- Peace Love Paint Typography Stencil
- Chalk Paint® by Annie Sloan: Primer Red
- 1" Stencil Brush
- Artist Brush
Prewash your T-shirt to remove any sizing. Center on your t-shirt, secure it with painters tape. Stencil with Primer Red Chalk Paint® using a stencil brush, or substitute with desired color of acrylic craft paint. Water down your paint slightly and using an artist's paint brush to paint in the "drips" freehand. To fix the paint and help it to retain the full depth of color when washing, you can simply put the finished T-shirt in the dryer on high for 30 minutes.
Light it Up with Custom Stenciled Lampshade
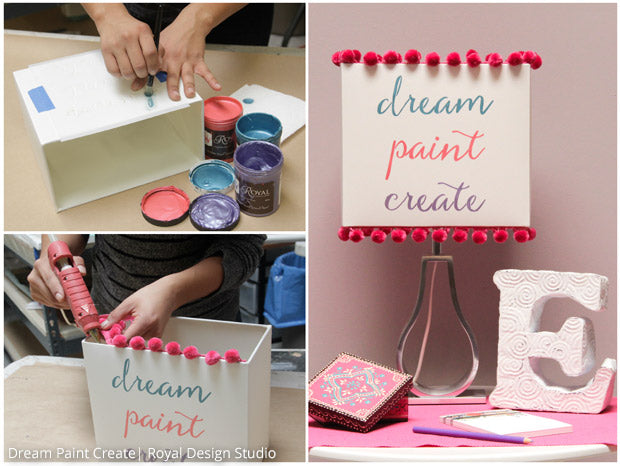
And last but not least.....Light up a room with a custom stenciled lampshade. This is a great DIY gift project idea! It's fast and easy....and inexpensive when you buy a thrifted lamp to upcycle. Add trims like pompoms, lace and fringe to make it even more special.
Stencil Supplies
- Dream Paint Create Typography Stencil
- Royal Stencil Creme Paints: Metallic Teal, Shimmer Pink, Frosted Lilac
- 1/2" Stencil Brushes
Center the stencil in the lampshade and tape into place. Stencil each word using a different color using a separate stencil brushes. Cut pompom trim to fit the top and bottom of your lamp shade and glue it on using hot glue gun.
Did you get some great ideas from this stencil post? Follow us on Facebook, Instagram, and Pinterest. We have ALL kinds of ways to inspire daily!


