

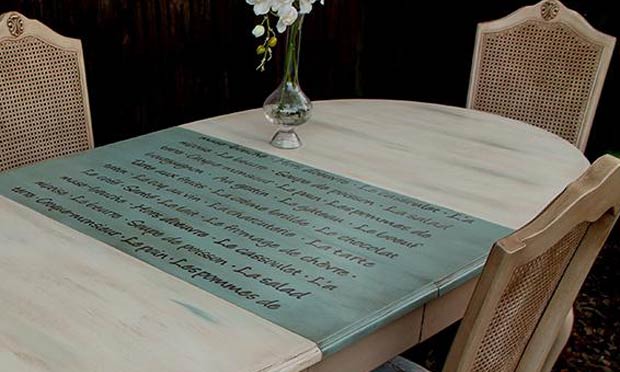
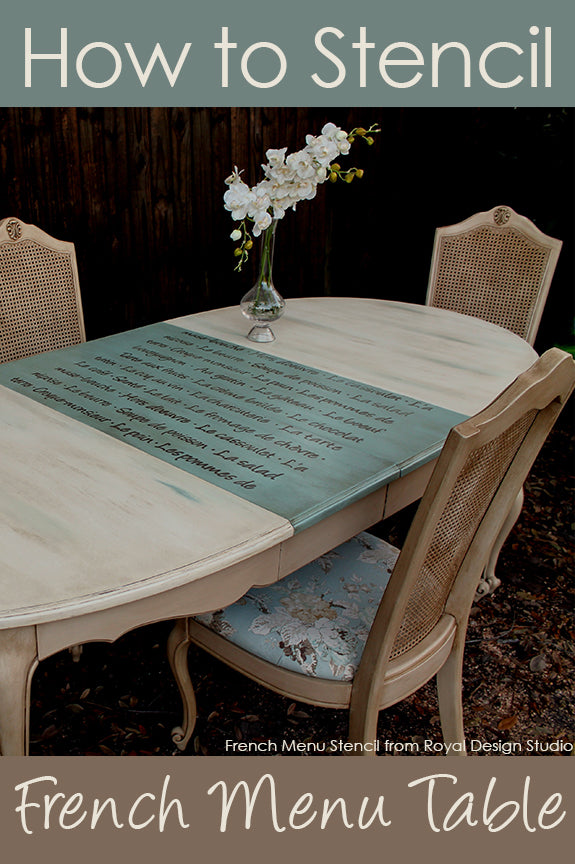
In this Furniture Stencil How-to, Michele and Ken Hiley of Stiltskin Studios share one of their favorite tricks for adding a surprise to their painted furniture tabletops: Stenciling the table leaves that are generally inserted when entertaining with a beautiful complimentary pattern and finish.
While we love the flexibility of dining tables with leaves, the leaves themselves,however, always pose a dilemma... you see, we typically only use our leaves during the holidays.
This means that while the tabletop is being used and abused, the leaves are stored away, staying pristine...and when we drag them out to use, they TOTALLY: a) don't match b) make us realize how much wear our tabletop has sustained throughout the year! Problem solved! We simply paint and stencil the leaves to coordinate, but not match, the tabletop. This allows us to pick up a fun accent color that we might not want for every day use and get a little creative with our painted furniture!
When we want to get creative, we immediately pull out my paint and formulate a plan...a plan that always includes a fabulous stencil design from Royal Design Studio. Royal Design Studio Stencils and products seriously changed the way we think about stencils
We used to have visions of boring ivy borders and single color roses...along with not-so-fond memories of paint bleeding under the stencil borders. We were NOT fans Turns out, Royal Design Studio stencils are beyond hip...so many cool designs, it's hard to choose (which would explain why we have so many!) We now have an entire stencil library...and we still covet more!
Another surprising thing we learned along the way? Stenciling is really pretty simple if you have the right tools and listen to the experts Once you've painted the surface and allowed it to dry (stencils look amazing on stained wood, too!) you're ready to get started.
Here's what you'll need for your stencil project:
- Royal Design Studio Stencil that works well for your surface area. We used the French Menu Lettering Stencil.
- Stencil Brushes (we keep at least three sizes of stencil brushes on hand)
- Stencil Creme Paints in color/colors of your choice. We used Smoked Oyster Stencil Creme. If you don't want a metallic finish, or want a different color than what is available, our second choice is Annie Sloan Chalk Paint. It's thick enough to work well with stencils.
- Paper Towels
- Painters Tape or Spray Adhesive
- Motsenbocker's Lift Off #5 for Stencil Cleaning
Chalk Paint® Decorative Paint Colors and Soft Wax:
- Old White Chalk Paint®
- Old Ochre Chalk Paint®
- Duck Egg Blue Chalk Paint®
- Annie Sloan Clear Soft Wax
- Annie Sloan Dark Soft Wax
Our table had two leaves, and the French Menu Lettering Stencil was perfect...fortunately, it fit the width and we only had to measure the length in order to position our stencil for maximum impact.
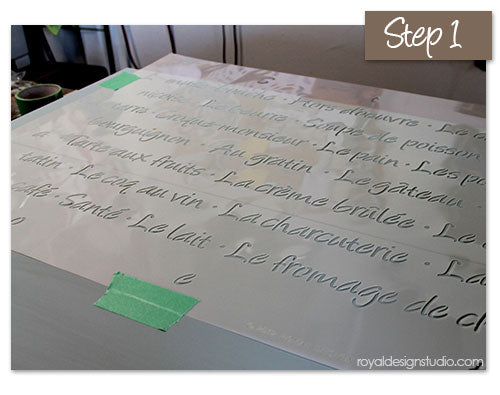
Step 1: Tape Stencil in Place
While spray adhesive works great, we save it for larger stencils being applied to walls or other vertical surfaces... when working on a flat surface, we find that simply taping the edges works great.
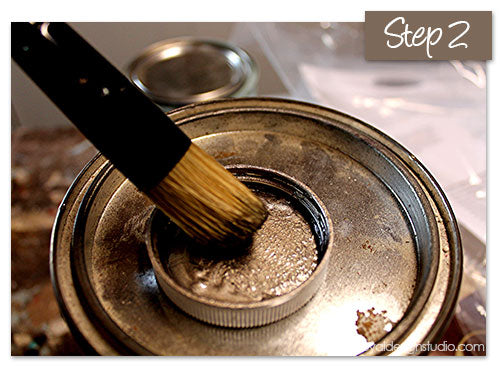
Step 2: Load Your Stencil Brush-Then Offload!
We made sure the leaves were firmly together, then taped on the stencil, starting at the upper edge You'll want to DAB your brush into the paint...we prefer to just dip from the Stencil Creme paint that is in the cap.
Now off-load your paint on to your paper towel or rag until your brush is nearly dry...a wet brush is NOT your friend here!
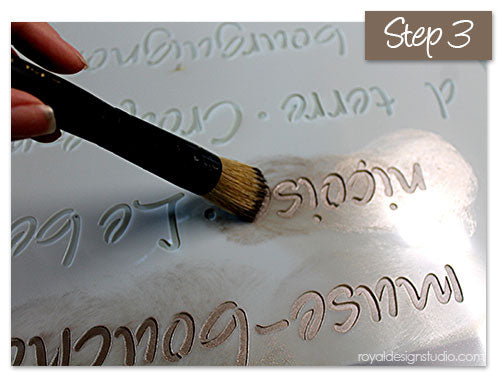
Step 3: Stencil with a Soft Touch
We like to applying the paint on the stencil itself before we apply it to the area to be painted. This ensures any extra paint is removed before you move into the open stencil areas.
You'll notice lots of paint all around the font in the photos...that's because they best way to apply paint when stenciling is to swirl your brush in a circular motion. Remember, you can always add more paint.
Here's why we prefer Stencil Cremes from Royal Design Studio:
- They are the perfect consistency for stenciling...a bit thicker than regular paint but thin enough to spread evenly.
- They dry almost immediately, which is handy when you are over-lapping your stencil. Who wants to wait around for paint to dry?
- The provide incredible coverage for stenciling.
- You can apply wax or other sealants right over the creme...they don't smear or smudge.
- They are formulated for easy clean up!
Once, we wanted white, so we purchased a stencil cream from the craft store...Disaster! It was too thin and after four passes, still not opaque. Then, when I went to wax the stenciled area, off it all came!
Trust us on this...for long-term durability and ease of use, stick with what works best! Once we've completed our first pass on the stencil, we like to do a second pass with the Stencil Cremes in the same fashion. We want opaque coverage, and a second pass makes sure we get it!
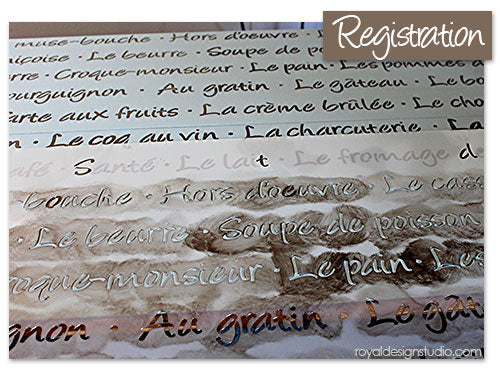
Royal Design Studio Stencils feature built-in pattern registration marks, making it easy to perfectly line up your stencil for the next section. In this case, much of the stencil was left hanging off the leaves. We found it was best to support this section in an upward fashion, rather than letting it hang down...we simply held that section up, which ensured the stencil on the table stayed lying flat.
We repeated the process on the second section. Once dry, we applied a thin layer of Annie Sloan Clear Soft Wax over the leaves. After allowing it to dry we applied Annie Sloan Dark Wax, thinned with mineral spirits to create a "glaze", removed the excess. allowed it to dry and then buffed lightly.
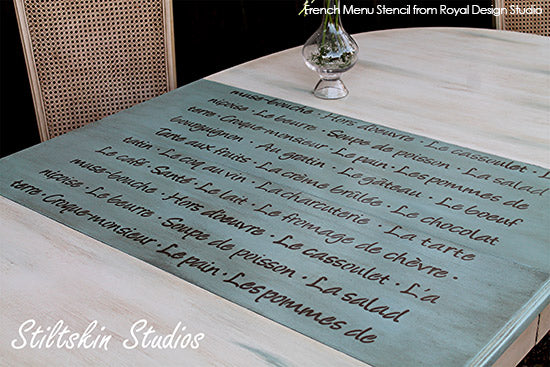
Now the utilitarian leaves are a focal point! In fact, we LOVE this French Menu Lettering Stencil so much, we have BIG plans for it in our own home... stay tuned!
Want to see more furniture decorative with our stencils and Chalk Paint® decorative paint?
- See more Chalk Paint projects in our Paint + Pattern digital magazine!
- Pretty Handy Stenciled Table Transformation with our Lisboa Tile Stencil.
- Game ON! Adorable stenciled game table.


