


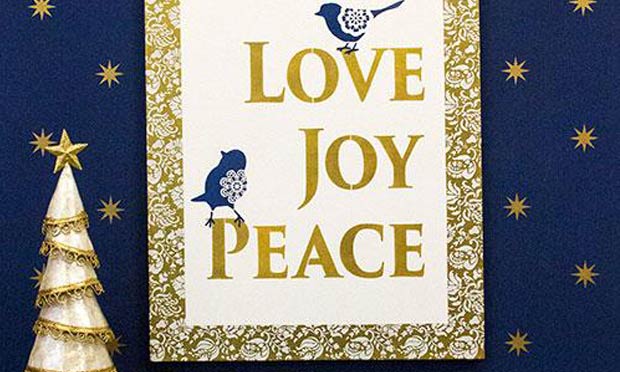

Get into the true spirit of the Holiday Season with this inspiring stenciled canvas project that we created especially for our Hometalk Google+ Hangout! Foregoing the usual red and green, we chose an elegant color palette of white, blue and gold that would be ideal for decorating for Christmas or Hanukkah, and can even be left up to enjoy long after the December holidays!!

Stencil Supplies for this Project:
We've assembled a specially priced Holiday Joy Stencil Kit that includes all of the stencils and supplies shown above. It includes...
Additional supplies you will need include: 24" x 30" Artist's Canvas, Painter's Tape, Paint Roller and Tray, Ruler, Pencil
To Begin: Basecoat your Artist's Canvas with 1-2 coats of the Pure White Chalk Paint® from Annie Sloan.

Step 1:
Measure in from the outer edge of the canvas 2.5" on each side and draw a pencil line with a ruler.

Step 2:
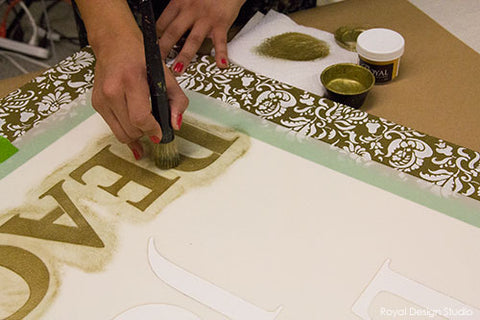
Use a good quality Painter's Tape (we used Frog Tape) to tape off a rectangular "frame" within the frame. Place the tape on the INSIDE of your pencil line. Notice how we mitered the corners to get a nice clean corners for our painted frame.

Step 3:
Frog Tape is designed to give you clean lines when painting after you burnish it well. As an insurance step to get a nice clean edge you can first use an offloaded Stencil Brush with your Stencil Creme mix in a light circular motion to further "seal" the edge. The gold color we used throughout is a custom mix of 3 parts Bright Gold to 1 part Antique Gold Stencil Creme.

Step 4:
Use a Foam Brush to then brush 2-3 quick coats of the Stencil Creme paint mix to get a nice bright gold effect. Note: Stencil Cream paints offer excellent coverage for stenciling, but when painting over a white background they DO require more layers to get good depth of coverage. Be sure to paint the sides of the canvas too! Allow to dry.

Step 5:
With the Painter's Tape still in place, stencil the Mini Brocade Furniture Stencil all around in the gold frame area. The built-in stencil registration marks will make it easy to repeat the stencil, even though you are just stenciling a small portion of it at one time. Use Annie Sloan Chalk Paint® in Pure White again to match the background. The Chalk Paint® is perfect for stenciling and will dry fast, allowing you to stencil 2 layers of paint one after the other to get good coverage. Be sure to offload your stencil brush after dipping into fresh paint by swirling it onto a good quality paper towel to remove excess paint. This will help prevent having paint bleed under the stencil.
Step 6:
Center the Love, Joy, Peace stencil in the canvas. Stencil with the gold Stencil Creme Mix, again taking care to offload your stencil brush well.

Step 7:
Place the two Sweet Tweets bird stencils as shown so that they look like they are sitting on the stenciled letters. Stencil with 2-3 layers of Annie Sloan's Napoleonic Blue Chalk Paint® to get good coverage and depth of color.

Background Option:
We painted the wall behind our Stenciled Canvas project to match!! The wall was rolled with 2 coats of Annie Sloan's Napoleonic Blue Chalk Paint® and stenciled with the same gold Stencil Creme mix using our Starry Night Wall Stencil. Note that we chose to simply stencil in the smaller stars of the pattern. This star stencil actually give you multiple options for how to use it!

Now you have a beautiful custom art piece that you can use year after year or give as a gift to someone special. The words in the Love, Joy, Peace Stencil could also be used separately, making it very versatile. Note that the stenciled "frame" option we show is one you can incorporate into other canvas artworks (simply switch up the color and the stencils), or even use this stencil idea on walls and furniture pieces.
Wishing you much Love, Joy, and PEACE this Holiday Season!!
Want more GREAT stencil project ideas!


