


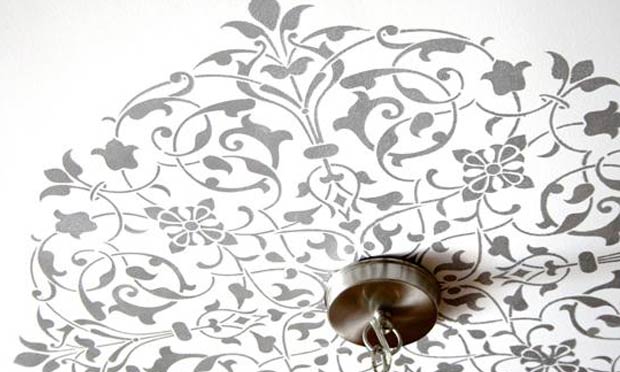

Painted detailing around a formal dining room chandelier is, in a word, stunning! But if, like me, you don’t happen to have the cash to commission a professional artist to add one for you, you may be feeling like it’s not possible. Luckily, you can easily recreate the look all by yourself using a stencil, a little bit of paint and a couple of hours during your next free weekend!
Supplies:
- Arabesque Ceiling Medallion Stencil
- Royal Stencil Creme Paints in Antique Silver
- 1 ½ inch Stencil Brush
- Paper plate
- Painter’s tape
- Paper towels
- Spray adhesive

First, it’s best to start with a clean surface, so take a damp rag to the section of ceiling you plan to stencil. Next, go ahead and remove the chandelier before getting started. You don’t need to unwire the entire thing - Just unscrew the decorative cap.
Next up, take your stencil outside to a well-ventilated area and spray the underside generously with spray adhesive. Let the glue set for about 5 minutes. This allows the adhesive to get more tacky than sticky.
Using a step ladder (and a friend on the opposite end), gently maneuver your stencil into place. Once the stencil is where you’d like it to be, press firmly across the entire surface so that it sticks to the ceiling. Lengths of painters tape cut to size pressed around the edges will also ensure that your stencil doesn’t move during painting.
Before getting your paint ready, use a pencil to put tick marks on the ceiling. There are two tiny triangles built into the stencil on either end that, once marked, will allow you to line up the other half of the stencil during the second phase of the project.
Pour a small portion of the Royal Stencil Creme Paint onto your paper plate, and then dab the Stencil Brush into it, being careful not to overload the bristles with paint. Remove any extra on a paper towel, and then start working your way across the stencil, using a dabbing motion. I did two coats, allowing for about 20 minutes of dry time in between. Gently peel the stencil from the wall after the second coat is finished, wipe off any extra paint and set the stencil aside.


After the first half has dried completely (usually within an hour), position the stencil on the other half of the chandelier using the tick marks made earlier to line it up. Then simply repeat the painting steps explained before.
Once the second half has gotten its two coats and the stencil has been removed, let the paint dry for another hour. Put your chandelier back in place, clean and store your supplies and then step back and enjoy your beautiful new hand-painted ceiling detail!


Carrie Waller is a freelance writer, designer and stylist living in Lynchburg, Virginia. For a real-time rehash of her DIY home renovation projects, visit her blog Dream Green DIY.


