


Our talented customers love seeing a total transformation unfold before their inspired eyes and creative hands when they use Royal Design Studio Stencils for painting. We’ve asked them for their best Before & After stencil project pics and we are shocked with their results! Who knew just a little paint and stenciling could make such a difference? (We did!) Check out these Before & After’s that WON big time and walked away with a beautiful stencil project AND a $50 stencil shopping spree!
Want to WIN your own $50 gift card? Enter our next Before & After Stencil Contest here.
TOP 10 WINNERS
![]()
“I looked at Royal Design Studio Stencils for a while and finally decided to take the plunge. After much deliberation, I chose the Bagru Block Print Stencil and the rest is history. It turned out far more beautiful than I could have imagined and transformed a space that I will enjoy spending time in! I have gotten so many compliments! Thanks Royal Design Studio!” – Aimee Glover
![]()
“Our sunroom was very sad when we bought our house. We ripped up old musty carpet and found decent concrete. We originally wanted to put down tile but the cost was too prohibitive. I started thinking of another way we could get the same look of tile but stay within our budget. Royal Design Studio Stencils was the best solution. A bit of time and patience ended up working great!” – Angela Woods
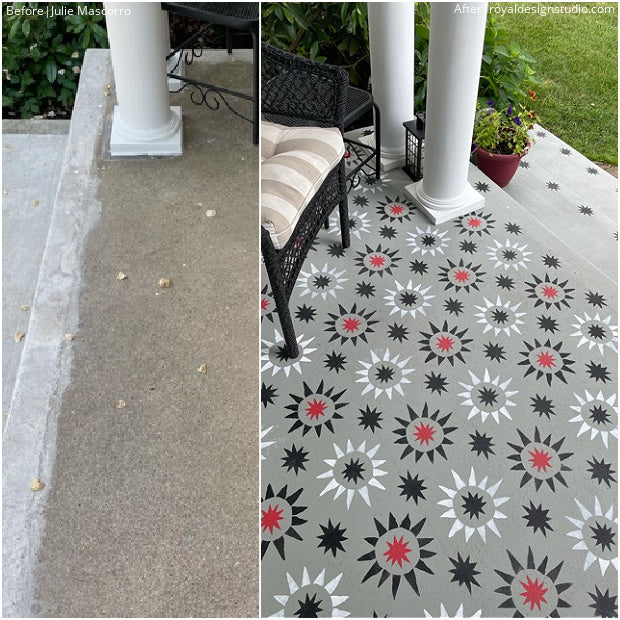
![]()
“Had so much fun repairing our 100 year old porch; the 3 different cements always looked so shabby. After painting it with the Starburst Tile Stencil, it is now SO much better! Even stenciled a row of stars on the steps so people don’t trip going down. We really enjoyed the finished project!” - Julie Mascorro
![]()
We began freshening our balconies up and started thinking about changes we could make to brighten up the space. Royal Design Studio Stencils seemed to be a great resource because it gave us the flexibility we wanted with color and styles. I did my research watching videos on the Royal Design Studio Stencils website and began gathering materials. The first thing was cleaning the concrete using Rust-oleum Cleaner and Degreaser for Concrete. Once the floor was cleaned, I began the painting. We picked the 12” Renaissance Tiles Set B Stencils and chose Sherwin Williams paints for Porch and Floor Enamel. I sealed it with Seal Krete’s Clear-Seal Concrete Protective Sealer. Now that it’s completed, it exceeds our expectations and we love the way it looks. It’s also created a stir in our little community as neighbors who live on higher floors can see it and really like it. I wasn’t sure that it was something I could do by myself but I got it all done.” – Kerry Day
![]()
“Prior to doing this project, my back patio was a place I never spent any time. I’ve dreamed of a back patio to sip my coffee and read a book on. Since painting it with the Augusta Tile Stencil, not only have I gotten compliments from every single person that has seen it, but it’s now a place that I thoroughly enjoy (and Saffron, my Great Dane, enjoys it too, as you can see :)) I’m so happy I no longer have to wait until “one day!” My patio is now the perfect place to relax and look over my garden! I love it, and I’m positive the Royal Design Studio Stencils made ALL the difference!” – Kristin Higgins
![]()
This is our stenciled concrete pad with the Dazey Tile Stencil. Thank you so much Royal Design Studio Stencils; this process was intense yet the payoff was perfection!!” – Natasha
![]()
“I wanted to bring fun and color to a typically drab block wall on the side of my house. I painted it with the Rabat Tile Stencil from Royal Design Studio. I love looking out my kitchen window now! “ – Anisa Ramjan
![]()
“I stenciled both the front and back porch. This is the front porch. Love the look. It gave it that pop it needed. I used the Island Dreams Tile Stencil. I have gotten so many compliments.” – Beth Schaffer
![]()
“We moved in a few moths ago and the house was a total fixer. I just had to get started on our front porch! It makes me so happy and I can’t wait to stencil my back porch too! This whole project with the Starburst Tile Stencil only took me a few hours!” - Kristin Homer
![]()
“I have been an artist most of my life. However, there was about a decade where I couldn't paint anymore because of PTSD. When the pandemic hit, I decided I was going to start painting again, and then I decided to redecorate my bedroom. I pulled the carpet out and painted on the subfloor with the Toledo Tile Stencil and I haven't stopped since. I ordered more stencils when I decided to start decorating the living room and renovating the rest of the house! I'm on fire!! The great thing about this is, I used to do this sort of thing for a living, and now I get to update my portfolio with some really cool stuff and start working again! I love Royal Design Studio Stencils!” – Carol Niotta
RUNNER UPS
![]()
“This is my first rendezvous with Royal Design Studio Stencils! Dining Room wall transformation from boring to beautiful with the Midtown Trellis Wall Stencil. Can’t wait to do more stencil projects!” – Alina Kazik
![]()
“I transformed my front porch using a green concrete paint as the base and then overlaying my Royal Design Studio Lisboa Tile Stencil over the paint and used a roller to paint the stencil design in Irish cream concrete paint. After drying, I applied a copper paint to the center circles and then sealed. Love. Love, Love it!!” – Paula Norman
![]()
“My laundry room needed TLC. Royal Design Studio Stencils helped me transform this bleak concrete floor into a beautiful work of art. Doing laundry has never been better. Everyone loves my new stencil floor.” - Alyson Killam
![]()
“I stenciled the backsplash of our new cottage kitchen. It’s a real fixer upper so I thought I’d spice up the kitchen without spending a lot of money because so much is needed elsewhere in the house.” – Anne DelGrande
![]()
“I just finished my stencil project and updated my tired bathroom floor!!! Thank you Royal Design Studio for the inspiration on your Instagram @royalstencils!” – Carrie Woodrow
![]()
“The cement front porch needed some help and it was my first stencil job. So I painted it with the Primrose Tile Stencil with some floor paint and here are my results.” – Edie Rice
![]()
Elissa Hardy painted this wall with the Starburst Tile Stencil.
![]()
We had never tried stenciling before, but after receiving quotes of over $2,000 to place pavers on our 16ft by 9 ft lanai, we decided to give it a try. For less than $100 we have a beautiful result, and the satisfaction of accomplishment. Here are some before and after pictures.” – Gary Serio
![]()
“Thanks for the fun project, Royal Design Studio Stencils! This is my craftsman home front porch summer re-fresh.” - Ingrid Ryder
![]()
“I’m so happy with how my stenciled front porch turned out! It took 2 days but was well worth the time and effort, even in the Florida heat.” – Joan Colonna
![]()
“I finally decided to update the look of the fireplace with the Petra Tile Stencil. It was a fairly easy project and I am SO thrilled with the results!” – Jodi Weaver
![]()
Johanne Bonin painted these bathroom walls with the ______ Damask Wall Stencil.
![]()
“All of the walls in my house are very white and I was looking to create a fun and bright little nook with the You’re A Star Tile Stencil to liven things up.” - Kailee Quinn
![]()
“I loved working with the ______ Damask Wall Stencil. It was really durable and flexible and the built in register cutouts were indispensable. Our guest bath was in bad shape. Now it looks super custom and gorgeous!” - Karen Gustovich
![]()
“Our master bedroom was previously very traditional with blue walls and antique furniture that was given to us. It was very old-lady-in-a-frock looking. I wanted something fresh and funky and more boho. I grew up in the 60’s and still love the hippy look. To achieve that I purchased used furniture, painted the walls and stenciled an accent wall with the Peacock Fancy Wall Stencil. I think it turned out smashing.” – Kerry Keenon
![]()
“As a single parent, I’m on a tight budget. I needed to revamp my fireplace and make it a fun focal point, but I didn’t really have the money for a major makeover. I used the ______ Wall Stencil with black and white paint and the gel stain to create the “wood” mantle and I’m absolutely in love with how it turned out!” – Kristin Johnson
![]()
“I love Royal Design Studio Stencils and have used them in multiple rooms. The floor in this bathroom was awful, cheap-looking, imitation wood flooring. I needed something in my guest bathroom to love and cheer me up and have my guests saying, "Wow, how did you do that?" So, I decided to use the Maison Floral Tile Stencil by Royal Design Studio. I also chose to use Rust-oleum's two-step process for home flooring. The first coat was the primer coat. The next phase of the project was stenciling. I used Annie Sloan Firle Chalk Paint. The last step was to apply the topcoat. I applied two coats. And voila, a lovely, bright, cheerful guest bathroom!” - Linnie Greene
![]()
"Before is an attempt at redoing my patio many years ago. I took it back to the bare bones and think the new version came out quite nicely. Thank you for making such lovely stencils." - Lisa Lester
![]()
“For this project, I painted a medium side table using BEHR paint in vintage mustard and Rust-oleum linen white chalk paint as well as Royal Stencil Creme in smoked oyster. The stencils I used were Royal Design Studio Small Jaipur Flower Garden and Taj Tile Motif. I love Indian designs and was excited to transform this table into something beautiful.” – Natasha Senieur
![]()
“We had a very dark dining room with red above and below the chair rail. The ______ Wall Stencil we picked was prefect. We love it and so does everyone who visits.” - Rajni Saund
![]()
“This patio was getting to be an eyesore and not used very often. The concrete had cracked. So with that being said I needed to brighten it up. We pressure washed the lattice and the concrete first. I patched the cracks and next we painted the base with two coats. I then applied the Mandala Fusion Tile Stencil. I worked on it for two days then my husband applied the sealer. The pattern concealed the imperfections. We couldn't have imagined how nice it could turn out.” – Sandra Westcott
![]()
“I was looking to brighten the grey cinderblock foundation of our beach house and found inspiration from Royal Design Studio. The furniture on the deck is bright and fun, but the siding and cinderblock really boring. This was my first time using Royal Design Studio Stencils.” - Shari Hirsch
![]()
“My stencil project is a patio rug. If I use a real rug, all the outside stuff that drops gets trapped along the edges and leaves a constant nasty mess. Painting a rug has solved that problem. This Royal Design Studio Stencil was the update it needed. I just love the new design and bright colors.” – Sharon Bostic
![]()
“I updated our concrete pool deck by painting the concrete gray and then stenciling the entire area in white with the Mandala Fusion Stencil. It was quite a few hours of work but definitely worth the effort!” – Shelley McKee
![]()
Tara Larkin painted this concrete patio with the Moroc Floral Tile Stencil.
![]()
“I wanted to give the hallway more light and life so I painted it with the Wisteria Arbor Vine Stencil.” - Verdin Padilla


