


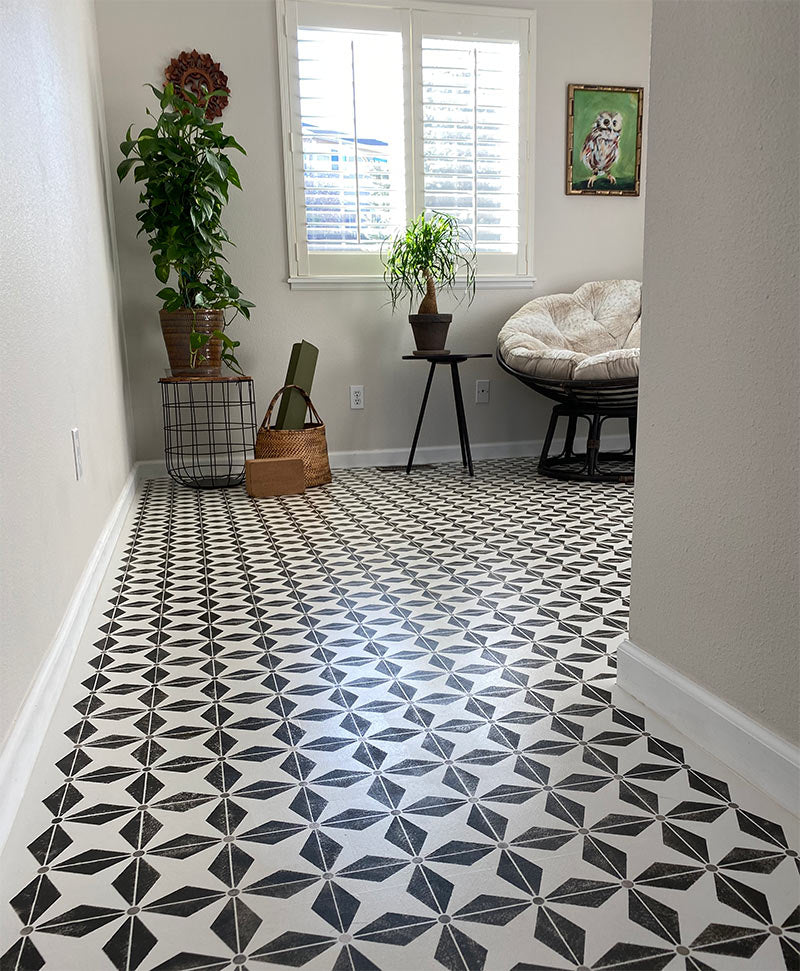
Is this you? You are unhappy with your current floor tile situation but you don’t have the heart, DIY skills, or budget to tackle ripping out and replacing that old, tired tile floor. Here’s the good news! You can take those tile floors from awful to amazing in the matter of a weekend using paint, stencils, and this DIY tile painting tutorial that gives you ALL the information you need to do it successfully and make it last for years to come.

Reasons to consider painting and stenciling your tiles
- Save time and money by extending the life of your current tile floor.
- It’s time and money saving option compared to a full demo and renovation.
- Paint and stenciling ceramic tiles gives you the option to add timeless and trending designs and patterns to your floors.
- Get a custom designer floor look at a low cost with paint and stencils.
- You can do this project over a long weekend.
- No expensive tools or DIY handywoman skills necessary.

Oh, but will it last?? Won’t it just chip off or get washed away?
This is the biggest fear and misconception that people seem to have about painting tiles, but the fact is that you CAN create a durable painted tile treatment using currently available, cutting edge paint technology-and by following some basic steps.
Read on as we share the tools, tile paint options, tips, and techniques you need to paint and stencil tile floors that last.
PLEASE NOTE: We are not a paint company, nor do we endorse or are compensated by any paint company. We've taken the time to gather this information for you as a service to help you with your tile stencil project based on extensive internet research and feedback from our many dozens of customers who have successfully painted and stenciled their own ceramic tile floors.
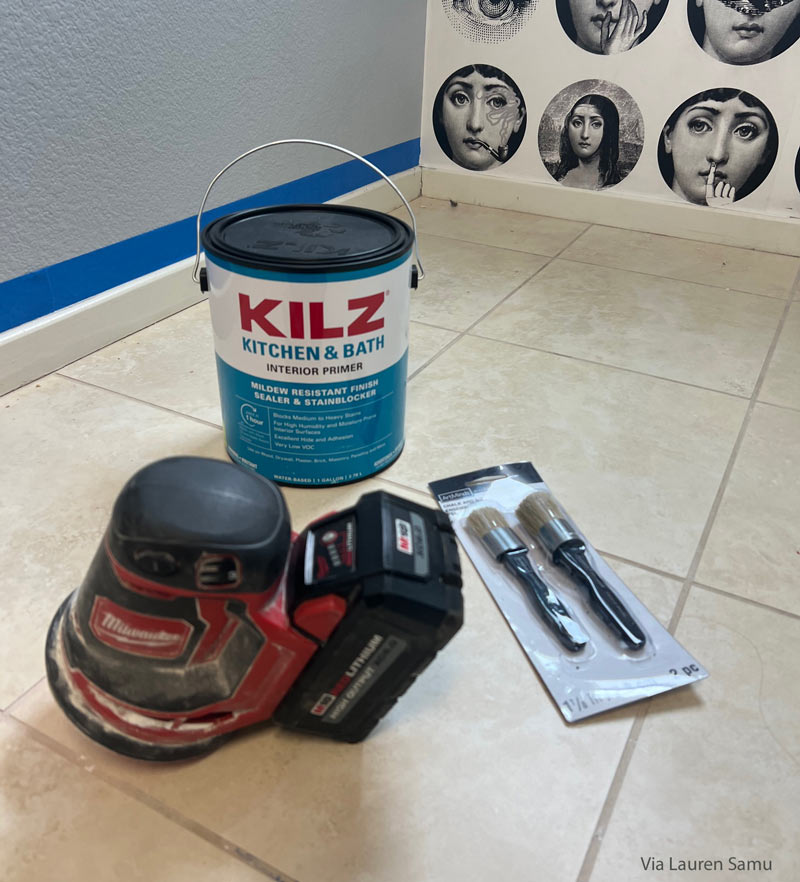
Paint and Stencil Supplies you will need:
- Painter’s Tape
- 100-220 grit sandpaper and sanding block or machine sander
- Good quality paint brush
- 2-Foam Roller/Paint Tray Combo
- TSP
- Sponge
- Stencil Brushes
- Floor Stencil of your choice
Paint Products you will need
Bonding Primer Options for Ceramic Tile Floors:
Quality Latex Paint Options for Base Coating and Stenciling:
More options...
Floor Sealer Options for Painted Tile Floors
- Varathane High Traffic Floor Finish Water-Based Polyurethane
- Minwax Fast Drying Water-Based Polyurethane for Floors
Follow these 6 steps to paint and stencil your NEW tile floors
Before you begin it’s a good idea to use Painter’s Tape to tape off and protect baseboards, cabinets, or walls from the tile floor paint and stencil process.
Step 1: Cleaning the Tiles
Clean and degrease your floor thoroughly using TSP Heavy Duty Cleaner for Painting following manufacturer’s instructions. Rinse well 2 times and allow to dry completely.
Step 2: Sanding the Tiles
Sanding your glazed tiles before painting will help to break the surface tension and create some “tooth” which will allow the paint to better adhere to the surface. You don’t need or want to sand deeply, just enough to scratch the surface of the tiles. Vacuum or dust the surface and rinse again with water to remove all traces.
Note: Many paint manufacturer’s will not require this step on their product instructions, but it’s extra insurance for better adhesion of the bonding primer to the tiles and doesn’t take long so we highly recommend it.

Step 3: Priming Your Tile Floor
Time to prime. Bonding primers are designed to adhere well to surfaces that regular paint won’t stick to over the long term: hard, glossy surfaces such as ceramic tile, metal, plastic, vinyl, laminate, etc. Bonding primers are the first layer of the “sandwich” of primer, paint, and sealer that is necessary for a successful tile paint and stencil project.
Use a good quality paint brush to paint the primer first around the edges of the floor and then paint in the grout lines-especially if they are deep as the paint roller won’t reach there. Then roll on one even coat overall. Follow the manufacturer’s instructions on the can for drying times and cleanup. Most bonding primers will need 16-24 hours drying time before applying the next layer of base color paint. They will also not fully cure and bond to the surface for 3-4 days-so don’t try doing a “scratch test” now to see if it’s working!

Step 4: Base Painting Your Tile Floor
After the Bonding Primer has sufficiently dried, apply the base paint color you have chosen for your floor in the same brush and roller manner as Step 3. The paints we recommend above are all designed to cover with one coat but you will have to determine for yourself if a second coat is necessary after the first one dries. We recommend using flat or matte finish paint for the base because that will be the easiest paint finish to stencil over without getting messy paint bleed-under as the paint is porous, especially before it fully cures. Satin finish paints create a hard, shiny surface that will be more challenging to stencil on and get clean edges. You can move on the Step 5 once the base color paint has dried for 2 hours or so.

Step 5: Stenciling a Tile Floors
Stenciling painted tiles gives you the opportunity to add a custom design element in the color of your choice. While the stencil pattern possibilities seem endless, we recommend you look through our Tile Stencil Collection and Floor Stencil Collection first. You can also find lots of design inspiration from past customer projects in our Stencil Ideas-Floor Stenciling Ideas area.
As with the painting, it’s best to start on the opposite side of the space from the door and stencil your way out of the room.
Your pattern placement will really depend on the type of stencil design you choose and the size and configuration of your tiles. We have many Tile Stencils that are offered in standard tile sizes so you can simply line them up over the tiles. If that isn’t the case, many customers choose to simply ignore the tile grout lines and paint the design simply as an allover pattern. The grout lines will have been painted out so they won’t be very noticeable-unless they were large and deep to begin with.
You can stencil with a Foam Roller or Stencil Brush, but stencil brushes will by far give you the most control over paint and pressure and cleaner pattern lines. If you do have any paint seepage under the stencil as you work, simply wait until the end of your project and use an artist’s brush and the base paint color on the tiles to touch up before sealing.

See these other blog posts for more specific information on stenciling techniques!
- DIY Décor: Stenciling Bathroom Floor Tiles
- How to Stencil Black and White Bathroom Floor Tiles
- How to Stencil a Tile Floor
Step 6: Seal and Protect Your Painted Tile Floor
Sealing your newly painted and stenciled tile floors with water-based polyurethane is the final step to create a lasting floor finish. While you did the correct surface prep of sanding and priming, used good quality paint for base coating your tiles and stenciling your pattern, properly sealing your “new” old floor with 2-3 layers of a protective topcoat as added protection for the previous layers will give you an even more durable finish to further extend the life of your tile floors.
Before applying the 2-3 layers of water-based polyurethane make sure your floor is free of any debris or dust and keep the area “off limits” for pets and family. Follow the manufacturer’s directions for application, drying and curing times. Allow your new tile floor to cure completely before using.
To clean your floors, sweep or dust mop regularly. For more thorough cleaning sponge mop with a mild cleaner diluted with water and towel dry. Avoid the following cleaners for floors sealed with water-based polyurethane: Murphy’s Oil Soap, Formula 409 or similar solvent cleaners, Pine-Sol or other pine-based cleaners, vinegar and ammonia.
Tile Floor Painting Alternatives:
The paints and process we detail above is by far the most common method followed by our stencil customers for painting and stenciling their tile floors. Many report that they are still happy with the results after 2-3 years.
There are other floor paint options in addition to the ones we list above, such as using Chalk-based paints for painting and alternative primers and topcoats. Paint technology is always advancing and many new products and “systems” become available regularly. Another system that some of our customer report great success with is Rustoleum Tile and Floor Paint and Sealer. We highly recommend that you do your own Google research to find out all the tile painting options available to you.


.jpg%20How+to+Stencil+Your+Bathroom+Floor+with+Chalk+Paint%20(4).jpg%20How+to+Stencil+Your+Bathroom+Floor+with+Chalk+Paint%20(7).jpg%20How+to+Stencil+Your+Bathroom+Floor+with+Chalk+Paint.jpg)