Thanksgiving is about savoring the beauty of Family and Fall, which makes it the perfect reason to create DIY décor for your home. These projects should highlight where and why your family gathers: around the dinner table surrounded by gratefulness. So, a stenciled tablecloth and inspiring wall art is definitely the way to go! Celebrate this time of year with these DIY Thanksgiving décor ideas to help get your house all warm and fuzzy for the season:
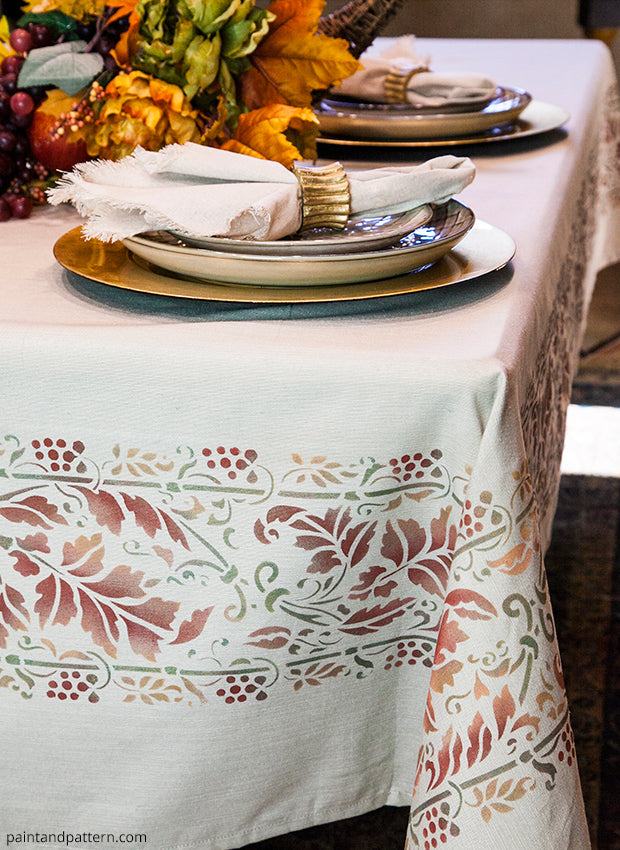
Thanksgiving DIY: Stencil a Harvest Border for Your Tablecloth
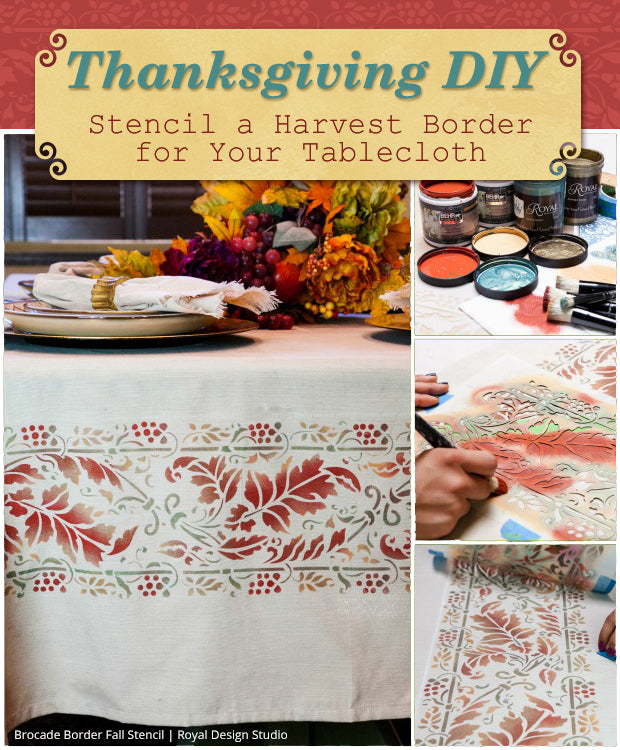
This Thanksgiving finish off your table with a personalized tablecloth that also perfectly complements yourdinner ware! For our project, we chose a border stencil to add a harvest-themed trim to our otherwise plain linen tablecloth, but you could also choose an allover pattern from our Holiday Stencils Collection and it is just as easy and effective!
Supplies:
- Stencil: Brocade Border Stencil
- Royal Stencil Crème: Green Patina & Antique Gold
- Stencil Brushes: three ¾” Stencil Brush & one 3/8” Stencil Brush
- Behr Premium Plus Ultra Paint: Red Chipotle & Stunning Gold
- Table cloth
- Painter’s Tape
- Paper Towels
- Ruler
- Chalk
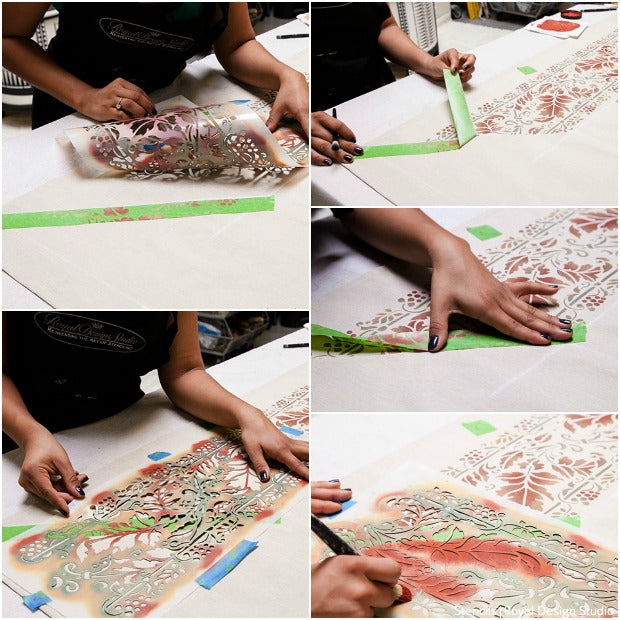
Step 1: Using a piece of chalk and a ruler, create a border inside your tablecloth that is the same size as your table. This will work as a guideline for the stencil.
Step 2: To make sure the space between your guidelines is the same all the way around, create a second line that is the width of the stencil. This will allow the corners of your stencil to perfectly match.
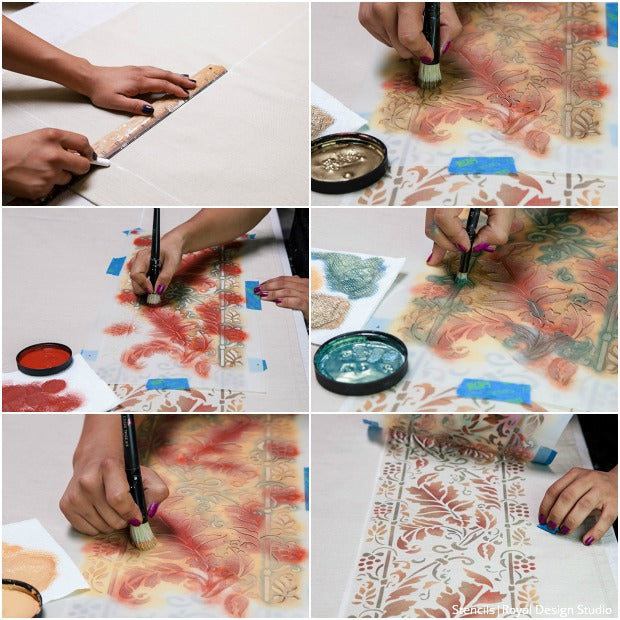
Step 3: Place the stencil between your guidelines. We recommend stenciling with the Red Chipotle Behr paint using a ¾” Stencil Brush first. Paint along the center of the leaves on the stencil and the grapes elements. Remember to load your brush with paint, then offload on a piece of paper towel before stenciling your work.
Step 4: Now use the Stunning Gold Behr paint to stencil the remaining areas of the stencil with a clean ¾” stencil brush. Having separate brushes for each color of paint will make stenciling a lot faster. Make sure to blend in the colors and cover all the elements of the stencil.
Step 5: Using the Antique Gold Stencil Creme and a ¾” Stencil Brush, lightly stencil through the whole design to add a little shimmer and depth to the pattern.
Step 6: With a 3/8” stencil brush, stencil all the stems on the design using the Green Patina Stencil Crème. Also blend this with the previously stenciled colors.
Step 7: In this stencil, the registration marks are placed outside the stencil design. We recommend using a piece of painter’s tape to mark them. As you move the stencil, simply align for the next repeat.
Step 8: When you reach a corner use painter’s tape to mark where your stenciling should transition. The tape should be placed from the corner of the table cloth through the corners of the guidelines you traced on steps 1 & 2.
Step 9: When you are done with the first side of the corner, remove tape and reposition it on top of the pattern’s stenciled edge. Align the stencil again so the pattern looks continuous. Then stencil the second part of that corner.
Step 10: Repeat steps to finish all 4 sides of your table cloth.
It’s that easy! In no time at all, you’ll have a beautiful tablecloth for your Thanksgiving Day feast!
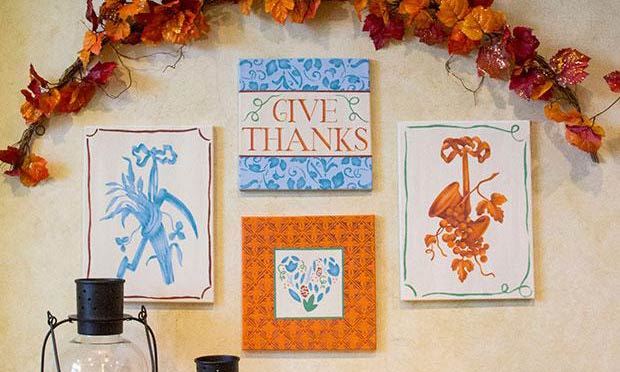
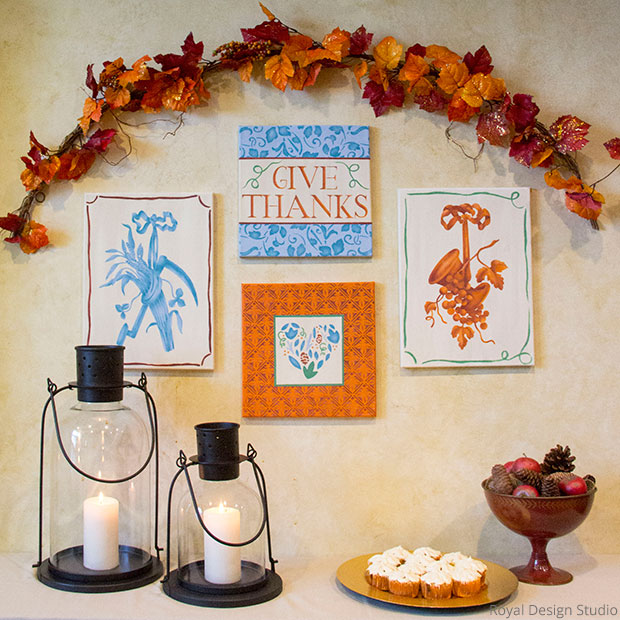
Thanksgiving DIY: Stencil a Fall Gallery Wall

Your own festive Fall wall gallery is a decorative art project that is not only on trend this season, but décor you can use year after year. Style each element together as pictured here or space them throughout your home to keep your holiday décor different and fresh.
This tutorial shows how you can create the three different styles of canvas art. We have chosen stencils from our Holiday Stencils Collection, however, as you can see the possibilities are endless in how you can personalize this project.
Supplies:
- Stencils: Tulip Tiles, Ashley’s Autumn Heart, Fruit Of Vine Trophy, Staff Of Life Trophy, Typography, Scrolling Leaves
- Chalk Paint: Old Ochre, Old White, Barcelona Orange, Primer Red, Louis blue, Blended Blue Paint: 1 tbsp Florence + 1 tbsp greek Blue, Blended Green Paint: 1 tbsp Antibes Green + 1/3 tbsp Greek Blue, Blended Orange Paint: 1 tbsp Barcelona Orange + ½ tbsp Old White
- Brushes: Medium Pointed Sash, Large Pointed Sash, 2” Foam Brushes, 3/8” Stencil Brushes, 5/8” Stencil Brushes, Small Paint brush
- Two 16” x12” canvases
- Two 12” x 12” canvases
- Painters Tape
- Bounty Paper Towels
Prep the Canvas: Using a large pointed sash brush, paint the canvas with Old Ochre Chalk Paint. Use long vertical strokes, while wet. Use a medium pointed sash brush to add a few shorter strokes of Old White Chalk Paint. Blend this with the Old Ochre Chalk Paint. Do this for all 4 canvases. Allow to dry.
16” x 12” Orange Canvas Art Steps

Step 1: Place the first layer of your stencil in the center of the canvas and secure with painter’s tape. Place four more small pieces of painter’s tape on the canvas under the corners of the stencil. Use a pen to color in the registration marks of the stencil on the tape. This will allow you to perfectly align the other layers of this stencil.
Step 2: First stencil with the lightest color. For this size, we recommend using a 1” stencil brush. If you apply a higher amount of pressure when stenciling the bottom right sides of each element on the stencil, you will create a 3D shadow effect.
Step 3: Load your stencil brush with the darker color. Make sure to off load excess paint on a paper towel. Then, stencil along the bottom right edge of each element in the stencil to again emphasize the shading effect.
Step 4: Repeat steps 2 & 3 with the remaining layers of the stencil.
Step 5: Use a piece of chalk to trace a ribbon like border around your canvas.
Step 6: Once you are pleased with the design use a fine paint brush to trace over the chalk. We used our blended green paint.
Step 7: This is the same process for the 16” x 12” Blue Canvas Art. If you’d like to replicate that project, we used our Staff Of Life Trophy stencil, Louis Blue Chalk Paint, our Blended Blue Paint combination and Primer Red.
12” x 12” Blue Square Canvas Steps

Step 1: Draw 2 lines in chalk to divide the canvas in to 3 horizontal sections. Once measured, apply tape to the canvas using the lines as guides. The first piece of tape should sit just below your chalk line. The second piece of tape should sit just above your chalk line. This placement of the tape ensures the top and the bottom are the same width.
Step 2: Using a foam brush paint the taped off section on each canvas. For our project, we used Louis Blue Chalk Paint.
Step 3: Stencil the top and bottom sections with an allover pattern furniture stencil. We stenciled the Scrolling Leaves Border Stencil with our Blended Blue Paint. To create the same shading effect, we applied slightly more pressure around the edges of the stencil and blended softly to the center.
Step 4: Find the center of your canvas by measuring corner to corner and vertical and horizontal. Next, plan the layout of your message. Double check to make sure it is centered.
Step 5: Stencil each letter with the lightest color first. We used Barcelona Orange Chalk Paint.
Step 6: Without moving the stencil, apply a darker color to the left edges of each letter. We used the Primer Red.
Step 7: To create a 1/8” thin border for each section, use a piece of painter’s tape on one side and a straight edge of a stencil on the other to create the line. For our project, we used Primer Red Chalk Paint.
Step 8: To add some flourishes, trace out a couple swirls using a piece of chalk next to the word “give”. Once you are pleased with the design, trace it with a fine paint brush. We used our Blended Green Paint to provide some contrast.
12” x 12” Orange Square Canvas Steps

Step 1: Measure a border around the squared canvas. Determine how thick your border should be based on the size of the stencil that will be in the middle. Once measured, apply painter’s tape to mark and protect the integrity of your border. For our project, we measured a 3” border.
Step 2: Use a foam brush to paint the taped off border. We used Barcelona Orange Chalk Paint.
Step 3: For the border, find an allover pattern furniture sized stencil to create a fun textured design. For our project, we stenciled the Tulip Tiles Stencil with Primer Red along the edges and our Blended Orange Paint in the middle.
Step 4: With the border done, place your stencil on the center of your canvas. We used Ashley’s Autumn Heart stencil. Stencil each element of the design using each color that was previously used on all of the canvases.
Step 5: Create a thin border around the frame using the Blended Green Paint. This is the same as Step 7 found in the 12” x 12” Blue Square Canvas tutorial.
As the years march on, this stencil project made from the heart will become a cherished keepsake for your family as they grow up and begin to have their own Thanksgiving traditions.
Want some more Fall-themed DIY fun? See what ideas we’re thankful for our our Holiday Stencils Collection! We can’t wait to see your Fall and Autumn stencil projects! Email us at projects@royaldesignstudio.com or tag us on Instagram with #royaldesignstudio.