


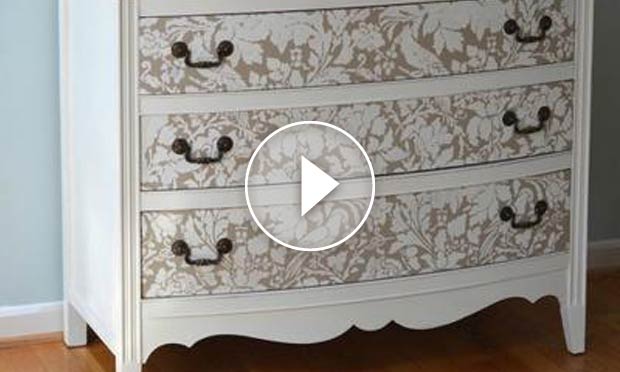
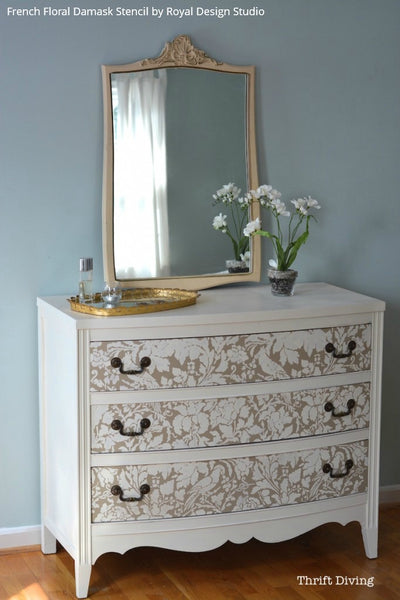
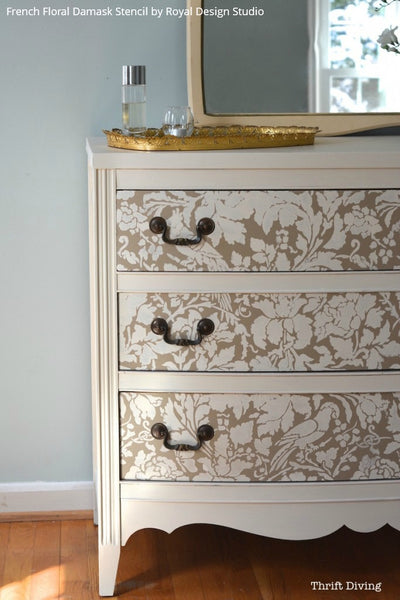
The talented DIY blogger Serena from Thrift Diving loves furniture makeovers! She had a thrifted dresser collecting dust in her garage that she finally brought out of hiding. And boy, did it need some help! One of the least expensive ways to makeover furniture is with paint and stencils. Check out her 10 steps to a beautifully painted and stenciled dresser:
Step 1: Prep Work
Sadly to say, you can’t just slap on some paint onto old furniture and expect to have a lasting result. You must do some minimal prep to keep it pretty. At the very least, clean the dresser by rubbing down with Denatured Alcohol, Dawn dish detergent or Simple Green. This will remove any grease or other residue that is on the surface.
Step 2: Choose Your Paint & a Place to do the Dirty Work
Will you be painting in your studio, basement, or garage? If you are painting indoors (especially in your house!), make sure to choose paint that has low or no VOCs (volatile organic compounds). Serena used RECLAIM paint for this DIY project, but Chalk Paint from Annie Sloan is always a good, safe bet for an easy furniture upcycle project.
Step 3: Cover Your Floor
Don’t ruin your floors. It sounds common sense but it still seems to get to the best of us out of sheer laziness. Use plastic drop cloth, towels, or newspaper to cover your floor.
Step 4: Clean Out the Drawers
If you found your dresser at a thrift store or you’ve stored it away for quite some time, you’ll definitely want to clean them out! Remove the drawers from the dresser and use a solution of vinegar and water to wipe it down. Use a steam cleaner for the dirtier areas.
Step 5: Test Your Paint & Products
There is nothing more frustrating than painting a dresser only to find that the old stain is bleeding through the new paint. Make sure to test your paint to see if it will get the job done. If you find that the previous finish is bleeding through, roll or brush on a coat of Clear Shellac. This “old school” alcohol based finish will dry quickly and an be sanded down easily for a smooth finish. Shellac will effectively seal the surface and keep old stain from coming through to your paint finish.
Step 6: The Painting Begins!
Use a roller, brush, or paint sprayer to paint your base coat onto the dresser. Aim for good, even coverage and thin layers.
Step 7: Paint Inside the Drawers
Don’t forget to paint the inside of the drawers and the sides too for a professional, finished look. You won’t want to open them up and not look cohesive with the rest of the piece. It’s all in the details!
Step 8: Two is Better Than One
It is suggested by most paint brands that you use two coats of paint rather than one for even coverage. Usual drying time in between coats is about 2 to 4 hours.
Step 9: Pretty Up your Piece with Pizzazz!
Serena loves stencils. They are the easiest way to jazz up a piece of furniture, whether you decide to use them on just the drawers or the whole dresser. After the base coat paint is dry, pick a pretty stencil pattern to compliment the lines of the furniture piece. The French Floral Damask stencil was perfect to pair with the soft feminine curves of this dresser.
Step 10: Seal the Deal
Finish off your painted and stenciled dresser with the sealer or your choice: water-based urethane or Soft Wax from Annie Sloan. Add some new hardware if you wish, or try updating the hardware with spray paint or our Metallic Royal Stencil Cremes. They work great on metal and accessories too!
And that’s it! It’s really that simple to take a piece of old furniture and totally transform it into something beautiful and fitting for your home without spending a lot of money! For a more visual tutorial, watch her video detailing these 10 steps to a furniture makeover:
Want more stenciled furniture ideas and tips? Check out these links!


