


Use this simple stencil technique to create a slightly distressed and faded look to a stenciled feature wall. It's perfect for French, Country, and Farmhouse Chic interior decorating. Try on a French Blue or Swedish Pink painted background if taupe walls aren't your fancy.
Stencil Supplies:
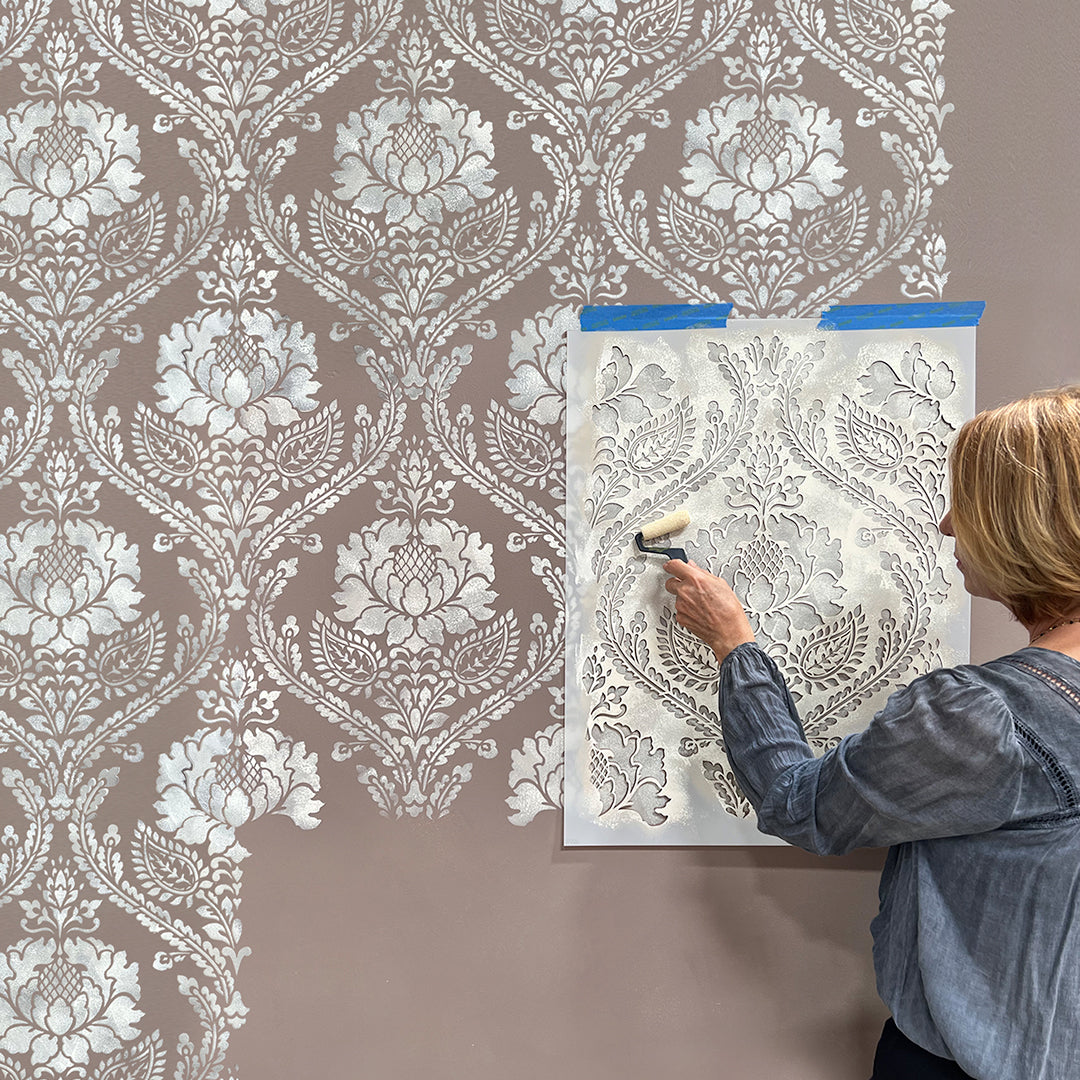
Stencil: Windsor Damask Wall Stencil
2” Stencil Brush
Folk Art Extender
Small Nylon “Touch-up” Roller
Behr Dynasty Flat Latex Colors: Basecoat-Art District, Stencil-Sculptor Clay, Off-White
Step 1
Pour about a half cup of Sculpter Clay paint into a shallow container and add approximately 1 teas. of Folk Art Extender to thin the paint to the point where it drips easily off the brush.
Pro Stencil Tip: The amount of Extender to paint is really a matter of taste. If you want a more translucent effect you will add more Extender a little bit at a time. It also depends on your paint and environment. If your paint is thicker and has more white pigment in it you can add more Extender. Also if you are working on a hot, low humidity day you may want to add more Extender.
Be sure to test your paint mix on a sample before stenciling if you are not familiar with this technique.
Step 2
Load just the tips of a 2” stencil brush with the paint mix, and offload excess onto paper towels using a hard swirling motion. It is important to offload the thinned paint well to avoid and seepage under the stencil.
Step 3
As you stencil, move the brush around the design area and vary your pressure on the brush to purposely deposit more and less paint in different areas. This will naturally create a more “distressed” and random look to the stenciling. Continue reloading the brush as needed and complete the full repeat in this manner.
Step 4
Reposition the stencil, aligning it perfectly with the built-in stencil registration marks each time to the complete your whole wall with this first color layer.
Step 5
Add a optional touch of texture for a more custom stencil treatment. Simply use a small touch-up roller with some Off White paint to add a little "frosted effect" here and there. Replace the cleaned stencil over the previous stenciling and lightly roll the color over random areas to create a highlight.


