


Are you looking for a weekend DIY project that brings out your crafty side? Stephanie of Quilt Addicts Anonymous found her inspiration after looking through the many stencil patterns available through Royal Design Studio. Let’s see what she did to makeover an old sewing cabinet from Plain Jane to regal Tiffany blue:

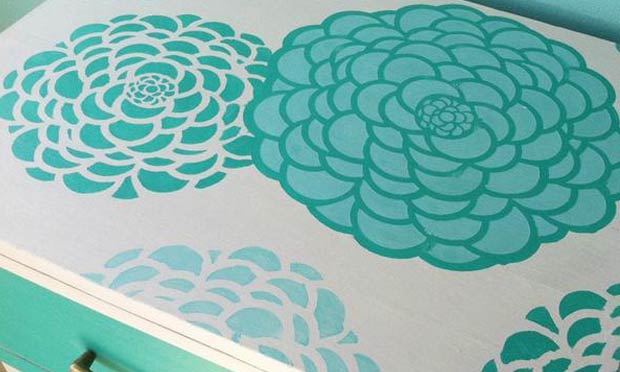
Her addiction to sewing and Annie Sloan Chalk Paint® have come together for a sewing cabinet makeover. She chose our Bloomers Furniture Stencils and Annie Sloan Chalk Paint® in Paris Grey, Provence, and Florence to revamp her grandmother’s timeless furniture piece.

She first took everything apart on the sewing cabinet that was screwed or held together by hinges. This helps give you easy access to all the parts of the furniture you need to paint or tape.

She then painted the entire cabinet with a base coat of Paris Grey Chalk Paint®. Once that coat was dry, she taped off the edges and used the Florence Chalk Paint® on the sides and front to provide contrast.
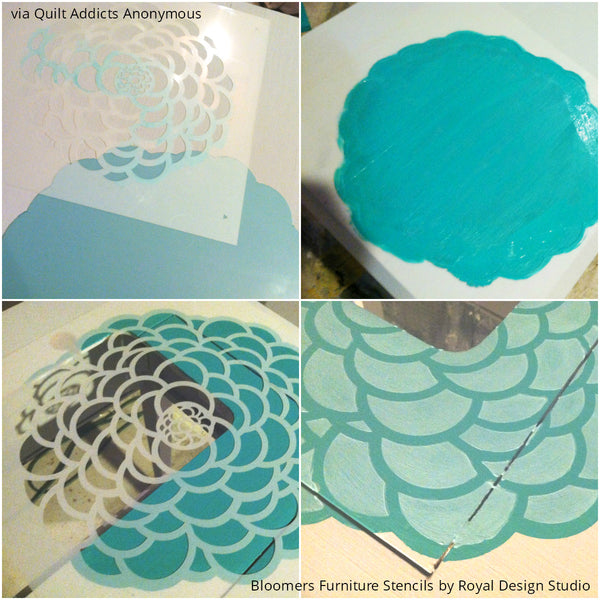
Now it’s time for stenciling! Stephanie chose our Bloomers Furniture Stencil, which includes three separate stencils for layering. Each of the two flower stencil included has a background layer, a flower petal layer, and a third layer that fits over the flowers so you can add other flowers around ones you have already stenciled. Here, the flowers are stenciled in the pretty blue hues of Provence and Florence Chalk Paint®.

Once you are happy with the placement of the stencils and the piece is dry, Stephanie recommends waxing with Annie Sloan Soft Wax and a wax brush. Apply the wax in a thin even coat and remove excess wax immediately with cheesecloth. Allow this to layer to dry before repeating with a second coat of wax. Let dry overnight and buff with a soft cloth to create a durable finish and soft sheen before putting back the cabinet together. And that’s it! Now she has a timeless piece of furniture that also goes with her current home’s aesthetic.

Stephanie loves how her sewing cabinet is now modern, colorful, and bursting with inspiration for even more sewing and crafting projects! Has it inspired you to makeover a piece of furniture using stencils? If you’ve used our Furniture Stencils in your home, we’d love to see your project outcome! Email us at projects@royaldesignstudio.com or post to our Facebook Page. We love to share your beautiful stencil projects with our readers!


