


Melissa of Polka Dot Chair shares some of the most adorable DIY projects on her blog. One such tutorial she recently posted was that of a Fold Over DIY Clutch using our fun Polka Party Stencil. This project can be quite easy and fun both at the same time, especially if you have access to a sewing machine.
Let’s take a look at what you’ll need for creating your own chic and fun polka dot clutch.

Supplies:
Royal Design Studios, Medium Polka Party Stencil
Paints: Metallic Paint or Royal Design Studio’s Stencil Cremes,
Fabric Painting Medium
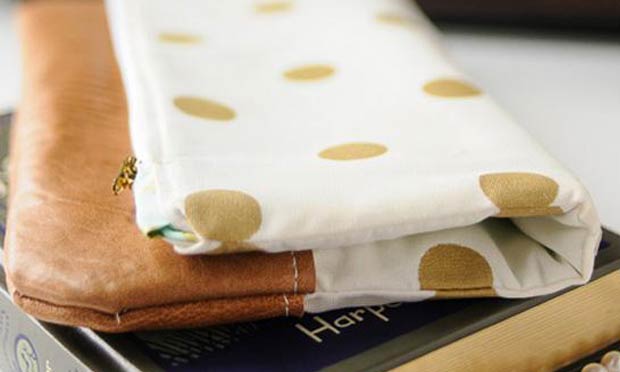
Types of Fabrics: 2- 13” x 13” pieces of cream fabric- get lighter than a denim fabric, but heavier than quilting cotton, 2- 13” x 13″ pieces of fabric for the lining, 2- 13” x 13” pieces of fusible fleece, 2- pieces of leather 3” x 13” - something lightweight - I used lambskin, 2- 3”x2” pieces of fabric for zipper tabs
Melissa also recommends using 2 pieces of 13” x 13” shape flex to press onto the inner side of the clutch – she didn’t use these this time but if she was to make this clutch again, she would.
9” metal zipper
Leather Needle
Types of thread: Heavy Duty Thread, Regular Thread
Spray Adhesive
Step 1: Stenciling the fabric.


To stencil the fabric, mix 1 bottle of metallic gold acrylic paint with one bottle of Fabric Painting Medium.
Spray the back of the stencil with repositionable adhesive spray to make sure the stencil doesn’t move while applying the paint. Place the stencil on top of your fabric while ensuring that the two are lined up the way you’d want to see the pattern on the finished product.
Be sure to off-load excess paint from the foam roller before you start stenciling on the fabric. If you want a darker shade, you can layer up the paint in a similar fashion till you like the shade of the polka dots.
Let both the stenciled fabric pieces dry well and then set the paint with a dry iron. If desired, apply Shape Flex to the wrong side of these two pieces.
Step 2: Attaching the Leather Part and Rounding the Bottom Edges.

Using binding clips, attach a 3” x 13” piece of leather to your stenciled fabric aligning its bottom edge with the stenciled fabric.
Using a leather needle and a heavy duty thread in your sewing machine (leaving a standard thread in the bobbin), stitch the leather trim piece individually to each side of the stenciled fabric.

Now using a CD, round the bottom corners of the pouch on both sides of the clutch.
Repeat the process for the clutch lining fabrics as well (as shown being cut out in the image above).
Apply the fusible fleece to the wrong side of the two clutch lining pieces.
Step 3: Zip it up

Next, for the zipper, fold the 3” x 2” pieces of the lining fabric into half, parallel to the 2” side. Place the raw edges of the zipper in between this folded lining fabric and pin along its edges. To make it easy to understand, Melissa compares the folded fabric to an alligator who is chomping onto the ends of a zipper. Repeat the same for the other end of the zipper.
Stitch along the side of the fabric closest to the zipper. Trim the excess fabric to flush with the zipper.

Now, pin the zipper to the outer edge of the stenciled fabric away from the leather edge. Make sure that the right side of the zipper is facing the inner side of the stenciled fabric, the side that will eventually be on the inner side of the finished clutch. Center the zipper on the clutch piece as the length of the zipper will be smaller than the length of the clutch.
The next step would be to pin the fabric lining such that it covers the zipper's fabric. Be sure to make the right side of the lining to face the wrong side of the zipper. Replace the leather needle with a regular needle back in your machine and use a standard thread to stitch the zipper in place.
Repeat for other side of the zipper.
Step 4: Finally, stitch up along the perimeter.

Flip the fabric inside out with the lining facing downwards and press the seams away from the zipper. First, stitch along both sides of the zipper and then unzip it.
Pin the two clutch flaps together with the right sides facing each other (the lining fabric will be outside at this point). Pin the two lining pieces together. Stitch around the perimeter, with a 1/2” seam allowance on all sides.
Once stitched on all sides, turn the clutch inside out through the zipper opening and ta-da! Your fabulous clutch is ready for you to show off!
For a detailed version of the steps, be sure to visit Melissa’s blog post Polka Dot Folded Clutch Tutorial.

We hope you will try out the above tutorial soon! If you are looking for more fabric stenciling inspiration, you might also want to check out the following:


