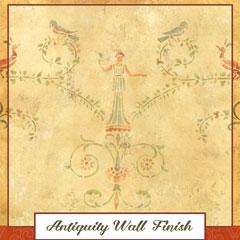

Recreate the look of a painted fresco wall by combining thin layers of plaster, color washes and a stencil from the Pompeii series of patterns from Royal Design Studio.
Like all of our Royal Recipe Professional Finishes Stencil Tutorials, this finish is designed for the experienced DIYer or professional decorative artisan. This is not a "beginner" faux finish and a basic understanding of artisan finishing techniques is required.

Supplies
- Royal Design Studio Stencils: Pompeii Panel Stencil, Pompeii Pedestal A Stencil, Pompeii Pedestal B Stencil, Pompeii Border Stencil, Heculaneum Pompeii Border Stencil
- Faux Effects® Products: Texture Coat, Sandstone, Plastertex, Aquacolor (Earth Brown, Yellow Ochre, Dark Brown, Earth Green, Teal, French Red, Autumn Brown)
- Tools and Supplies: Assorted Stencil Brushes, Trowel, Large Stippler Brush, Chip Brush, Sea Sponge, Plastic Putty Knife, Terry Towel, ¼” Nap Roller and Tray, 220-grit Sandpaper
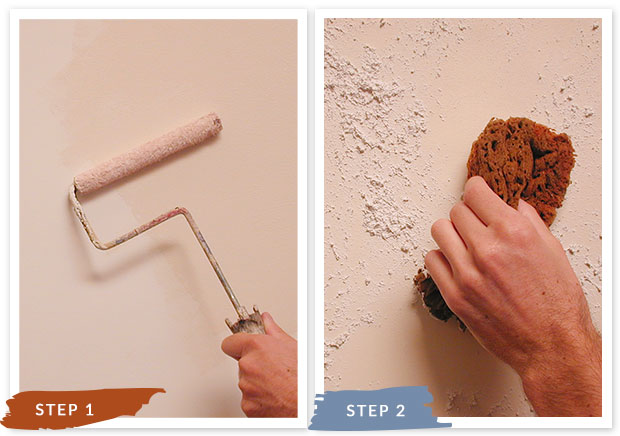
Step 1: Roll a thin, even layer of Texture Coat over the entire surface. Texture Coat contains a gritty, sand-like substance in an Off White Aquabond Base. Let dry.
Step 2: Thin Sandstone slightly with some water (10% or less). Pick up some material on a damp sea sponge and dab it lightly and randomly over the surface, working in areas about 3’ by 3’ at one time. The idea is to create irregular areas, not spots, and to have the material peak up. There will be thick and thin areas, with the thickest areas being not more than ¼” thick.
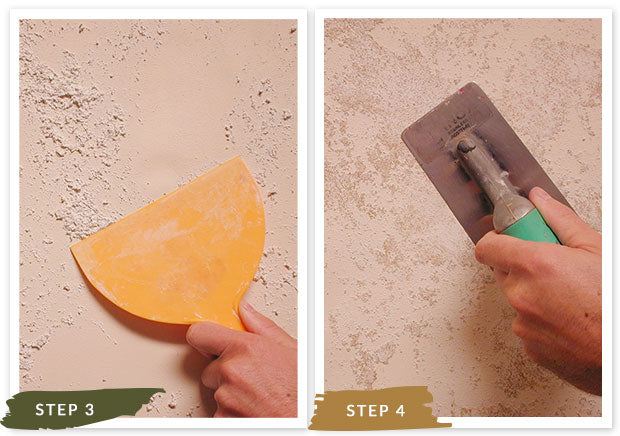
Step 3: Use a plastic putty knife to lightly knock down just the peaks. Do NOT flatten the material out at this point. That will come later after the material has been given time to “set up” a bit.
Step 4: After the Sandstone had set up to a “half-wet, half-dry” state, you will want to knock it down and burnish it with a metal trowel to bring out the embedded color. The amount of time it takes will depend on the humidity in your environment and how thickly the material has been applied, but is generally a couple of hours. As the material dries more, you can feel free to press harder to bring out more color. 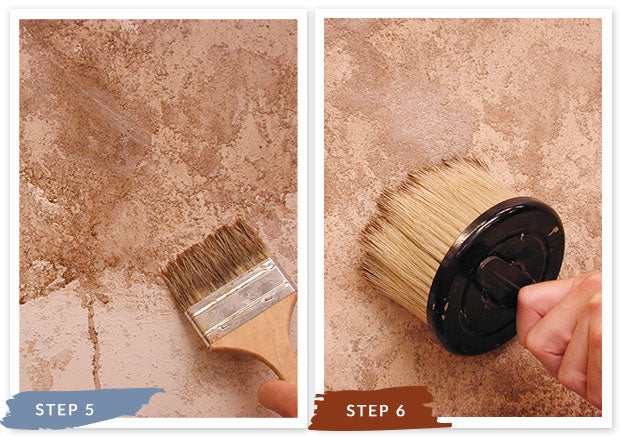
Step 5: Create a colorwash tint by mixing Dark Brown Aquacolor and water at a rate of 1T. color per pint of water. For large wall areas this can be transferred into a spray bottle for quick application. Otherwise, brush it on the surface, with a chip brush.
Step 6: Smooth out and blend the colorwash into the wall with a larger stippler brush or terry towel. Let dry. This will be quick when using water as opposed to glaze. 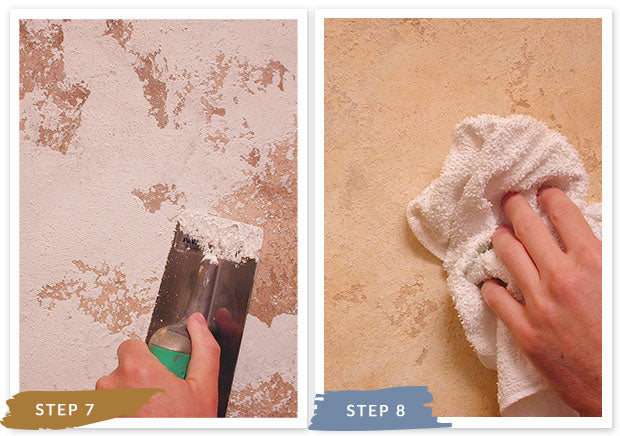
Step 7: Use a Venetian Trowel to trowel on a tight skim coat of Plastertex over the Sandstone base. Push the material into the recessed areas and scrape it off the higher areas by using the trowel at a perpendicular angle to the surface. The idea is to reveal the underlying texture of the layer below. Note that some small, irregular open areas remain, revealing the color and texture below.
Step 8: Create another colorwash tint by mixing 1.5 teas. each of Yellow Ochre and Earth Brown in a pint of water. This may be applied in the same manner as Step 5.

Step 9: Smooth and blot off excess with a clean terry towel.
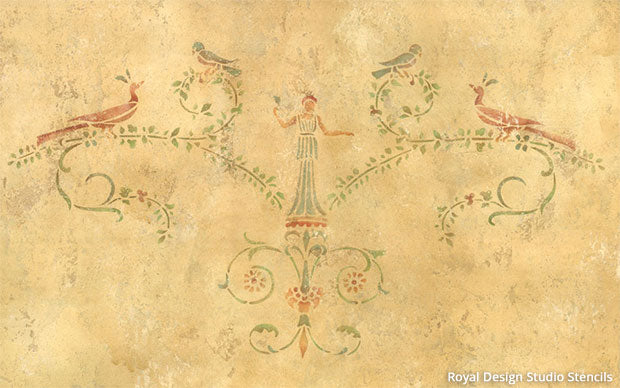
Step 10: For the stenciling, use Earth Green, Teal, Autumn Brown, and French Red to stencil in various elements within the 2000 Pompeii Panel design. Use smaller ½” brushes to keep the colors confined to the design elements you wish to place them. 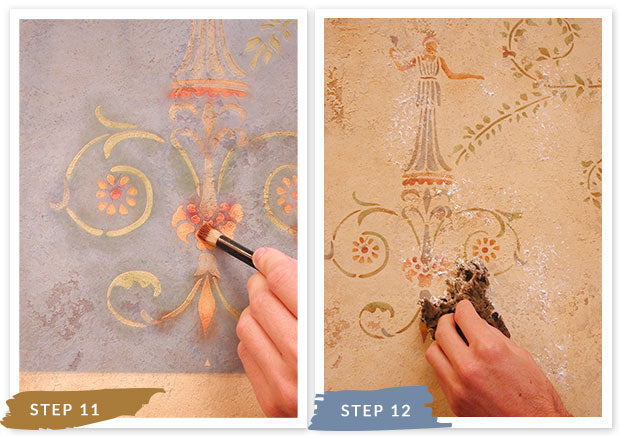
Step 11: This detail shows the color usage throughout the design. The Pompeii Panel stencil contains the center and right side of the design. Flip the stencil and align on the registration marks to complete the left side.
Step 12: Use Earth Brown now to add some depth and shading around the edges of the design area. This also helps to neutralize the brighter colors a bit.
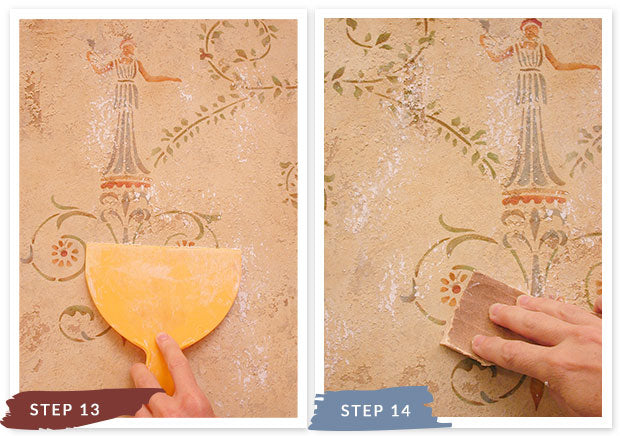
Step 13: When the stenciling is complete, take a damp sea sponge again and lightly dab on some irregular areas of slightly thinned Plastertex over the background and little bit on the stencil design.
Step 14: Use the plastic putty knife again to lightly knock down the Plastertex. Hold the knife at a very flat, parallel angle to the wall. Let dry.
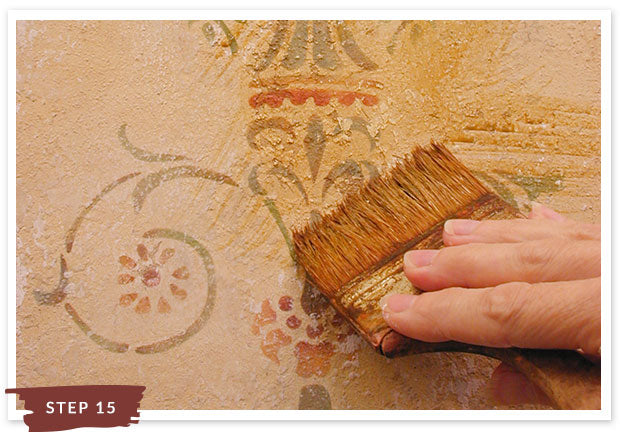
Step 15: Use 220-grit sandpaper to lightly sand over the surface, particularly on the stenciled areas. This will help to further distress and “age” the finish.
Step 16: Repeat with a final colorwash over the entire finish with the Yellow Ochre/Earth Brown mix. Smooth and blot off the excess again with a Ultimate Stippler or terry towel.