Hexagon Penny Tiles are a classic tile pattern for over 100 years because this style works so well with so many different types of home decor. Our Hexagon Penny Tile Floor Stencil makes it easy for you to transform your kitchen or bathroom tile floor inexpensively with just paint, saving you hundreds of dollars from a messy and costly remodeling project.
We have even included a sweet, separate tile stencil detail that allows you to easily take your Hexagon Penny Tile pattern to the next level by adding a customized dramatic black tile accent.
Read on and watch to see how easy it is to stencil your floors with this well-loved hexagon penny tile pattern.
Hexagon Penny Tile Stencil Supplies:
- Hexagon Tile Stencil Pattern
- Two 1” Royal Stencil Brushes
- Latex or Floor paint in white and black
- Tape, paper towels
Background surface painted with a medium gray color in a paint suitable for your surface*
*See our other stencil tutorials on how to prep and paint tile or linoleum floors: How to Stencil Floors DIY Tutorials

Stenciling the Hexagon Penny Tile Pattern

Stencil the Hexagon Penny Tile stencil pattern, using a large stencil brush* and a best quality white latex or “chalk type” paint. Be sure to offload excess paint from the stencil brush onto paper towels each time you reload the brush.
*You can also stencil with a dense foam roller, but you will have more control over paint seepage-and less touchup at the end-if you use a stencil brush.
You will want to use paint that has a lot of pigment so that it covers well. White latex paint that is a “paint and primer” in one is a good option.
You will need to do a minimum of 2 passes of paint on each stencil repeat to get opaque coverage with the white paint.
Repeating the Stencil Pattern

Stencil registration is easy because it’s built right into the stencil. Simply line up the stencil over previously stenciled tile shapes as you more left/right and up/down across the floor.
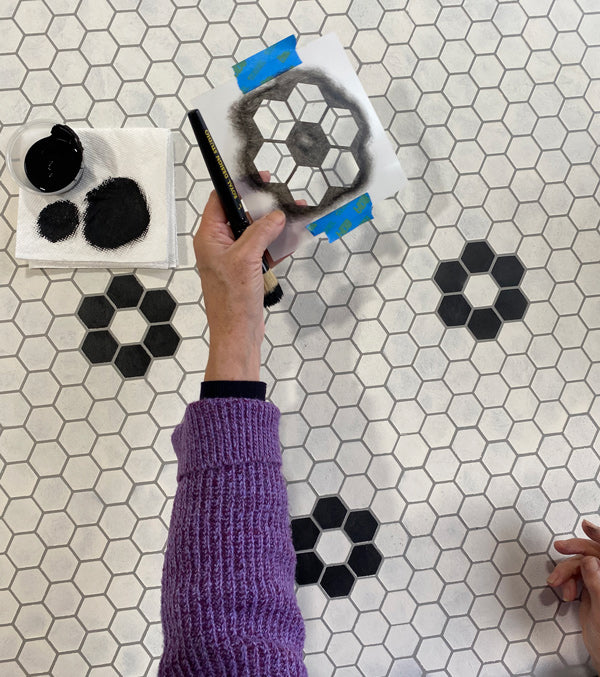
Adding in the Stencil Pattern Flower Detail

The Hexagon Tile Floor Stencil comes with extra stencil elements to allow you to easily add in custom design options to the stencil pattern, including a floral element. You can place this detail element randomly or in a standard repeat pattern.
For the repeat pattern, determine and count the spacing you want between the tile rows and mark the center tile of the “flower” with small pieces of blue tape. For this design we chose to count 12 rows one way and 14 rows the other way.
Place the center of the “flower” over the tile with the blue tape on it and stencil all the open tiles around it with black paint-going directly over the previously stenciled white tiles.
Seal and Protect Your Stenciled Floor

After all stenciling and touch up paint is completely, wipe down your floor with a damp cloth and seal with 3 layers of a good quality water-based urethane for floors, such as Diamond Varathane.
Looking for MORE for your floor? Check out this other floor stenciling idea posts: Must-Try DIY Ideas with Floor Stencils
Happy Floor Tile Stenciling from Royal Design Studio!