What is stenciling? Stenciling is just painting a wall… but with pretty pattern! Stenciling a wall is just like painting a wall… except stenciling adds that extra personal touch of pretty pattern, all while being beginner friendly and budget friendly. You can easily find your favorite color of interior latex wall paint at your local paint store and your favorite wall stencil pattern at Royal Design Studio Stencils. Since you only need one stencil to stencil an entire wall, you’ll find that stenciling is actually so much cheaper than wallpaper. BONUS: Stenciling is safe for walls! Since it’s just paint, you can easily paint over the wall if you change your mind. Stenciling is paint, pattern, and SO pretty! Learn how to stencil a wall with just paint with this video DIY tutorial:
Supplies:
- Petra Tile Stencil (Large) from Royal Design Studio
- Royal Stencil Brush or paint roller
- Wall paint color of choice
- Roller and tray, painter’s tape, bubble level, and paper towels
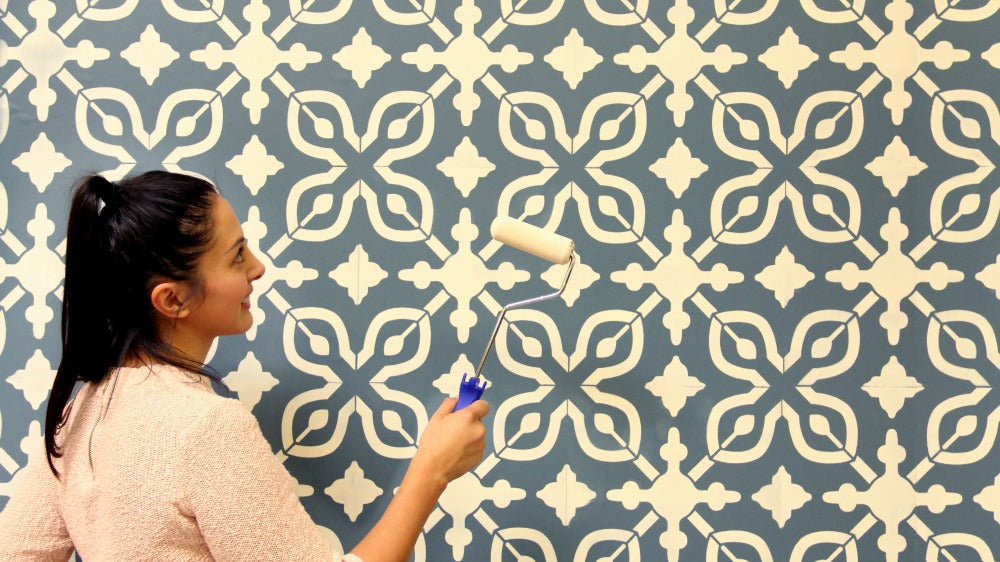
Step 1: Place and secure the tile wall stencil with painter’s tape. We recommend starting the first repeat at the top center of your feature wall. Use a bubble level to make sure the wall stencil is straight.
Step 2: Load a paint roller with the black paint or your favorite color. Then offload the excess paint from the roller onto a paper towel. This offloading technique helps ensure the paint is evenly dispersed onto the roller, you are using minimal paint, and prevention of paint bleeding under the stencil.
Step 3: Stencil the design with light to medium pressure.
Step 4: Remove the wall stencil and reposition it to the next repeat. There are built in registration marks on the wall stencil so that you can perfectly and easily align it.

Step 5: To stencil into the corners, ceiling line, or floor line you will need to bend the stencil and use a small stencil brush. Follow this helpful video tutorial: How to Stencil into Corners, Ceiling Line, and Floor Line.
Step 6: Repeat Steps 2 through 5, working up, down, and side to side to completely stencil your feature wall with the tile design. You many need to clean the paint off your stencil every so often. Follow this helpful video tutorial: How to Clean Paint Off Stencils and Brushes. And that’s it! Now you’ve got a beautifully stenciled wall with a tile wallpaper-like pattern!

Do you have a wall stenciling project you’ve been working on? We’d love to share and show it off to our readers! Email us at projects@royaldesignstudio.com, share them on our Facebook Page, or you can even Instagram your projects and tag us with #royaldesignstudio
Looking for more Stencil Ideas like this? Check out these other stencil ideas and tutorials:
- Bathroom Stencils: The Wonder Wall that Lasts Longer than Wallpaper
- Back to Back: Kitchen Backsplash Painting Stencils