There is no one better to tell the stencil story of how paint + stencils can transform a tired space than our amazing stencil customers!
One of the most popular places our customers are using stencils these days is on concrete porches. It makes sense! A porch is the gateway to the house and enlivening up this area is the perfect way to welcome guests (and yourself) into your home.
Painting and stenciling a concrete porch requires following some basic steps, a few days of your time, and choosing the right kind of process and paint.
Read on to the end of this Blog Post for our Painted and Stenciled Porch basic instructions.
But first, get excited by these pretty painted porches that our stencil customers have created for their own homes, read their stories to see what inspired them to use stencils, and get some ideas for how to transform your own porch or patio into a welcoming showplace with stenciling.

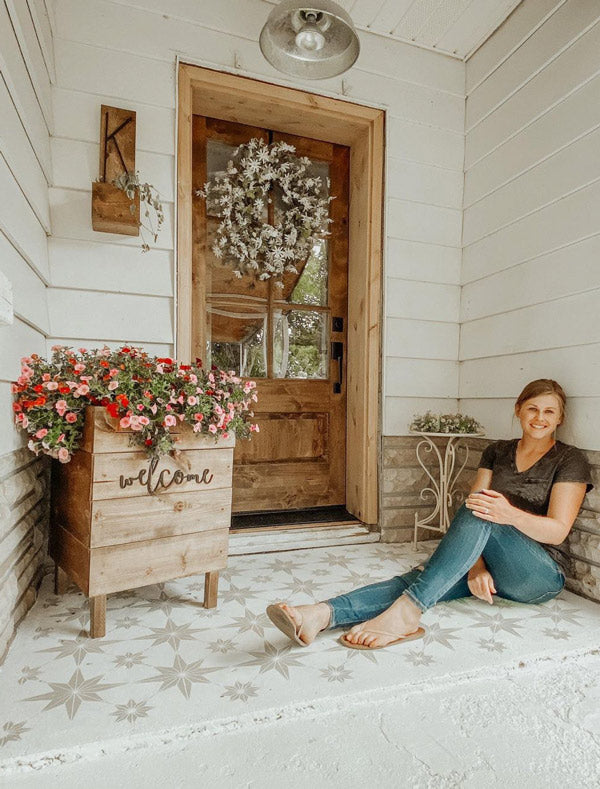
Star Quilt Tile Stencil by @berryberryquitecontrary
Kayla’s Stencil Story:
“Happy!! Happy!! Happy!! Ahhh this front porch stencil design makes me SO happy!!!! Oh my gosh, I knew I would really like it, I just don’t think I knew how much of an impact the stenciling would make.”
Kayla’s Porch Painting Process:
Scrape and sand off any peeling paint. Roll on your base color (Kayla used Behr Porch & Patio Floor Paint in white with black for stenciling. Stencil the stencil pattern with a stencil brush (brushes are easier) and be sure to offload excess paint on a paper towel.
Visit Kayla’s Blog Post for more details on how she Transformed Her Porch with Stencils.

Starz Tile Stencil- @julianna.welty
Julianna’s Stencil Story:
“Our 1920s bungalow porch received a big makeover (at a small price tag) using Royal Stencil’s Star Tile Stencil (Large, 12” x 12”). I love the results and am excited to enjoy my porch this summer!”
Julianna’s Porch Painting Process:
“First, I cleaned and sanded the entire porch, paying extra attention to areas that chipped from previous owner’s paint job.
After drying, we painted the entire surface using Sherwin Williams SuperDeck (Solid) in the color HGSW2502 (Equestrian Brown). This required two coats and 1.5 gallons of paint.
After the drying overnight, we used Sherwin Williams Porch and Floor Enamel in the color HGSW3084 (Mushroom Market) to stencil. We tried both rollers and stencil brushes, but had the best results using a stencil brush.
After allowing to dry, we went back through with the stencil paint color to do touch ups with an small angled brush. The stenciling part of the porch painting required less than a quart of paint.”

Intertwined Stencil by @meghan_beltran3
Meghan’s Stencil Story:
“I cannot help but sit back and feel so proud of this project. It’s truly amazing what some hard work and paint can do to a space.”
Meghan’s Porch Painting Process:
Meghan prepped the concrete porch surface by power-washing and letting it dry completely. For the paint she used Behr Masonry, Stucco & Brick Paint for the basecoat and stenciling. Meghan used a stencil brush instead of a paint roller. “It takes a longer, but you’ll get more crisp lines! Be sure to offload the paint before stenciling-You can always add more before you remove the stencil but you can’t take it away.” After everything dried she sealed the stenciled porch with 2 coats of Behr Low-Luster Sealer for Concrete.

Supernova Allover Tile Stencil/Medium by @christinamariesargent
Christina’s Stencil Story:
"I recently used your stencil in Supernova tile stencil to give our historic craftsman home a porch makeover! I used the Royal Design Studio stencil with Valspar porch and patio paints to create the three-tone design. the stenciled porch feels so much larger, cleaner, and more inviting! We are in love with the results."

You’re a Star Tile Stencil by @thesassybarn
Ashlee’s Stencil Story:
“I’m a DIY winger…meaning I just go for it and hope for the best! Our porch needed some love, and with a little concrete patch, paint and a stencil, I’d say it got the love!”
Ashlee’s Porch Painting Process:
Ashlee’s 1949 concrete porch needed some repairs before painting. She started by using Sakrete Fast Setting Cement Patcher to fill in the holes and rough areas. For the base paint she had Behr Low Lustre Enamel Porch & Patio Floor Paint tined to Whisper White and applied two coats overall.
The You’re a Star Tile Stencil was stenciled on the porch landing area with a the color Putty from Fusion Mineral Paint which is a paint and topcoat in one. To complete her stenciled porch transformation Ashlee sprayed over the stenciled stars with Flex Seal Clear Spray to protect them further

Intuition Allover stencil by Linda Roberts
Linda’s Stencil Story:
"We had a pad outside our casita sliding doors that was begging for some Royal stencil Love! My daughter had recently been to Rome Italy and shared pictures of the Roman Bath mosaic floors. That was my inspiration. I was hooked on many of Royal Stencil patterns but Intuition pulled at my heart!”

Duomo Tile Stencil by Renee Silk
Renee’s Stencil Story:
"This project was so much fun. The layers of color transformed this concrete porch! I painted this together with a friend of mine and thankful for her help, as it was a large porch! We first painted with Terra Cotta Porch Paint then stenciled with Duomo Tile Stencil in size large. The mailman was happy to see progress made during delivery all week! "

Concrete Porch Painting and Stenciling Basics
Are you inspired to tackle you own porch with a paint and stencil project? Here are the basic steps to create your own Porch Stencil Story :
Concrete Surface Prep:
It’s super important to start with a clean and sound surface. Remove and chipping paint and fill any cracks or gouged areas with a concrete patching product.
Ideally you should power-wash the surface, but at the very least wash and scrub well with a stiff-bristled brush and some diluted TSP and allow to dry completely.
Porch Painting:
Paint your chosen base color with a quality paint designed specifically for concrete and porches. Most major paint companies have a special line of paint JUST FOR THIS. See a few porch paint options below and be sure to follow the manufacturer’s instructions. Be sure to let the base paint dry thoroughly before stenciling.
Behr Porch and Patio Floor Paint
Valspar Porch, Floor, and Patio Paint
Benjamin Moore Floor and Patio Paint
Stencil Painting:
Ideally you will stencil your porch pattern with the same type of paint that you used for base as this will provide the most durability. You can have the paint tinted to the color of your choice from their color deck.
You can stencil with stencil brushes or stencil rollers. Most of our customers report that stenciling with brushes gives you a lot more control and cleaner stencil lines-and we agree!
Sealing and Protecting Your Stenciled Porch:
Most of paints designed for porch and patio painting don’t require a sealer for protection. But if you want to give your newly painted and stenciled porch more protection you can seal it with an appropriate topcoat for painted concrete.
We recommend Seal-Create Premium Low Gloss Sealer which waterproofs and seals painted, stained and bare concrete surfaces.
We hope you find this basic porch painting information useful. It’s based on the best practices of our stencil customers. You can find a lot more detailed information by Googling and your own investigation.
We love to receive and share your stencil projects and stories! Every quarter we host a Before/After Stencil Contest where we encourage you to submit your project for a chance to win a $100 Gift Card. So keep those projects and Stencil Stories coming!


