


Stenciling a realistic looking brick pattern with stencils just got easier! We took our popular Herringbone Brick stencil pattern and created a simple faux brick technique that makes it super easy for you to get the brick look with stencils in your own home. It’s the perfect technique to stencil the look of brick on floors, walls, and kitchen backsplashes. We simply use 3 different gray colors of “sample pot” paint, stencil brushes, and a classic retro sponge painting technique overall to create a fast stenciled brick finish that really “fools the eye”.

If you have been loving the look of stenciled brick and thinking to try it in your own home, watch the video and read on to see how easy it is to stencil faux brick that looks like the real thing.…
Stenciled Brick Supplies:
- Herringbone Brick Stencil Pattern
- 3-1 ½” Stencil Brushes
- Behr Sample Paint pots from Home Depot:
- MQ2-60 Iron Gate, PPU24-09 True Taupewood, MQ2-55 Park Avenue
- Tape, paper towels
- 2 medium pieces of sea sponge (you can simply tear a larger sponge to create smaller pieces)
- 4 small paint trays or plastic plates
- Stencil Spray Adhesive (optional)

Preparation for Stenciling Herringbone Brick
For wall stenciling, your surface should be painted with an eggshell-sheen paint in a light off-white color.
For floor stenciling preparation over existing tile, vinyl, or linoleum, you will need to follow the appropriate steps to sand, clean, prime and paint your floor. This floor stencil post shows you how: Paint and stencil over tile floors
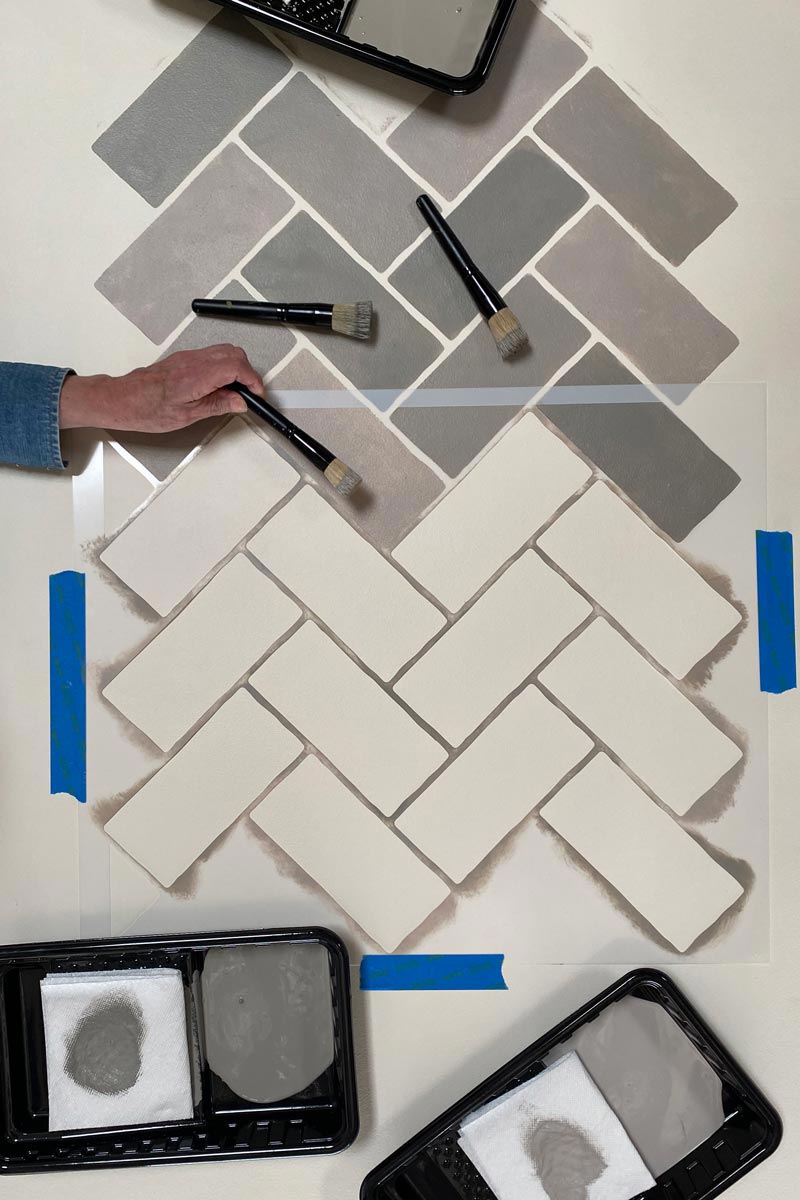
Put each of the three gray paint stencil colors into a separate paint tray, plastic plate or similar. You will be using all three colors in each repeat of the stencil. There are full bricks in each stencil repeats, so you will color 4 random bricks in each of the 3 colors. You can keep the colors the same in each repeat, but it will look more realistic if you stencil each repeat a little differently.
Pro Stencil Tip! Add more variety to the stenciled bricks by combining 2 different colors into one brick. You are the artist so what you do is up to you.
Place the brick stencil pattern upside down on a protected surface and mist the back lightly with Stencil Spray Adhesive. This will help to hold the solid “grout lines” of the stencil pattern securely in place on your surface.
Fast and Easy Brick Stenciling
Load just the tips of your stencil brush into the stencil paint and offload your stencil brush onto paper towels to create a “dry brush”. Swirl and stipple the paint into a brick area to cover completely and evenly.

Finish 4 full bricks in one color, then the second, then the third.
Aligning each stencil repeat is easy! Simply move the stencil left/right or up/down and position the stencil “windows” of partial bricks over previously stenciled brick in the painted pattern.
Continue stenciling to complete the stenciled brick pattern on your floor and wall. When you get to the corners you will bend the stencil into the corner or edge and hold it in place with one hand while you stencil with the other. Another option is to draw in the brick pattern at the corners with a pencil and use tape to tape off the brick shape.
Add texture to your brick stencil pattern
With all the brick pattern complete, it’s time to add the overall sponge texture that will easily give your stenciled brick a realistic look.
Pour some of the background paint color into a container and thin by adding an equal amount of water. Stir well. Pour into a paint tray or shallow plastic container.

Dampen and wring out two pieces of natural sea sponge. Dip one sea sponge into the paint mix and dab off excess onto paper towels.
Sponge right over all the stenciled bricks and base color, covering several bricks at one time. Immediately soften and blend the sponging slightly by dabbing over it with the plain damp sponge. Have a small bucket of water handy so you can rinse the second sponge often as it becomes filled with the paint color. The sponged texture will soften the gray paint colors and create a realistic brick effect.
Using the same color paint as the background means you don’t have to be careful where you place the color because it will disappear into the areas between the bricks. That’s what makes this stenciled brick technique so easy!
Seal and protect your newly stenciled brick floor
Allow the paint to dry for a day and then seal and protect all with 2-3 coats of a good quality water-based urethane for floors, such as Diamond Varathane.

This brick stenciling technique works just as perfectly with our other brick stencil pattern, Brick Wall Stencil.
Find more ideas and inspiration for stenciling brick patterns around your home in this blog post DIY IDEA: STENCIL A FAUX BRICK WALL OR SUBWAY TILES
Happy Herringbone Brick Stenciling!


